A brake fluid flush clears old, moisture-filled fluid so brakes feel firm and react whenever someone truly needs them. Most cars benefit every 2 to 3 years or once fluid looks dark, the pedal feels soft, stopping distance grows, or brake lights glow on the dash. A safe flush uses the correct DOT fluid, keeps the reservoir full, and bleeds each wheel slowly until clean, clear fluid flows, leading into the next simple steps.
Understanding What Brake Fluid Does in Your Braking System
Because of its brake fluid composition, it does not compress like air. This lets pressure move evenly to each corner, helping the car stay stable and predictable.
It also carries heat away from hard-working parts and protects metal surfaces from wear.
Once drivers understand this concealed teamwork, they feel more confident caring for the system that helps them and everyone riding with them feel safe.
Why Brake Fluid Breaks Down Over Time
At the same time, brake fluid pulls in water through tiny openings in hoses and seals, a process called moisture absorption. That trapped moisture lowers the boiling point and invites rust inside lines, calipers, and valves.
Little by little, pedals feel softer, stops feel less certain, and people feel less safe. Comprehending this change helps drivers stay ahead of problems and feel more confident together on the road.
Key Benefits of Performing a Brake Fluid Flush
Comprehending how brake fluid slowly breaks down makes it easier to see why a fresh fluid flush feels like a clean start for both the vehicle and the driver. Whenever technicians replace old fluid with new, they restore the system to peak condition. This restoration brings several meaningful improvements that drivers notice immediately.
| Benefit | What Happens | Your Experience |
|---|---|---|
| Better Brake Performance | Moisture is removed, boiling point increases | Stops feel more reliable and controlled |
| Improved Pedal Responsiveness | Air pockets eliminated, fluid flows smoothly | Pedal feels firm and responsive under your foot |
| Corrosion Prevention | Metal components stay protected from rust | Expensive repairs are avoided for years |
Fresh fluid gives drivers the confidence they deserve. The pedal becomes firmer, stops happen faster, and the whole braking system works together smoothly. Your vehicle becomes safer and more dependable on every trip.
Common Warning Signs Your Vehicle Needs a Brake Fluid Flush
What suppose the brakes just don’t feel right anymore? That uneasy feeling often shows initial warning signs that a brake fluid flush is due. Once someone pays close attention, the car quietly asks for help before things get scary.
- Fluid discoloration in the reservoir, turning from clear or light amber to dark brown, hints at moisture and debris building up.
- Soft or spongy pedal feel makes each stop less confident, as though the car is slow to listen.
- Dashboard indicators like the brake, ABS, or traction lights signal the system is sensing a problem.
- Longer stopping distance or extra pressure on the pedal during daily drives tells the driver the fluid can no longer perform at its best.
Recommended Brake Fluid Flush Intervals by Driving Conditions
Recommended brake fluid flush intervals change based on how and where someone drives, so it helps to consider the difference between gentle everyday use and tougher, stop and go conditions.
In standard service, a car could only need a flush every couple of years, but in humid climates, with towing, or with performance driving, the fluid breaks down faster and needs attention sooner.
Through matching the flush schedule to real driving habits, a driver can feel more confident that the brakes will respond once life suddenly demands a hard stop.
Standard Vs Severe Service
Even though every car uses brake fluid to stop, not every car needs it changed on the same schedule, because daily driving conditions quietly change how fast that fluid wears out. Standard and severe service definitions help explain these maintenance differences so drivers do not feel confused or alone about what their car needs.
- In standard service, a car sees gentle use, mostly steady cruising, with little stop and go. A flush every 2 to 3 years often fits this pattern.
- In severe service, the car tows, climbs hills, or faces heavy traffic, so fluid heats up more and breaks down faster.
- Humid climates or road salt areas also count as severe, because moisture and corrosion build more quickly.
- If unsure, following the severe schedule gives extra safety and peace of mind.
Climate and Humidity Impact
As strange as it feels, the weather outside really does reach into the tiny spaces inside a brake system, so climate and humidity quietly change how often a brake fluid flush is truly safe for a car.
In humid regions, moisture slips into the lines faster, so humidity effects push fluid to degrade sooner and invite rust inside concealed parts.
When someone lives near the coast, in rain-prone areas, or where roads are salted in winter, climate influence becomes even stronger, so shorter flush intervals help the brakes stay trustworthy.
In hot mountains or cities with long downhill drives, constant heat also wears out fluid quicker.
Through noticing local weather patterns, a driver can choose a flush schedule that truly fits real life, not just the calendar.
Towing and Performance Driving
How quickly towing and performance driving wear out brake fluid often surprises drivers, because every long downhill pull with a trailer or hard lap on a track heats that fluid far beyond normal daily use.
In these moments, brake overheating and repeated hard stops push moisture, air, and tiny debris deeper into the system, speeding up fluid contamination and breakdown.
To stay safe and feel in control, many owners in these groups follow tighter flush intervals, such as:
- Towing often: flush about every 12–18 months.
- Mountain or hilly driving: flush about every 18–24 months.
- Track days or spirited canyon runs: flush before a season, then check midseason.
- Any mix of these: ask a trusted shop to test boiling point and moisture yearly.
Choosing the Correct DOT Brake Fluid for Your Vehicle
What kind of brake fluid does your car actually need?
It starts with the DOT specifications listed in the owner’s manual. Those letters and numbers, like DOT 3, DOT 4, or DOT 5.1, tell you the fluid’s boiling point and chemical base, which must match the system’s design for safe stopping.
From there, it becomes a fluid compatibility question. DOT 3, DOT 4, and DOT 5.1 are usually mixable with each other, but they are not compatible with DOT 5 silicone fluid. Using the wrong type can damage seals, change pedal feel, and reduce braking power.
When people choose the correct fluid, they protect the ABS, keep pedal feel confident, and support everyone’s safety every time they ride together.
Safety Precautions Before Starting a Brake Fluid Flush
Before you start a brake fluid flush, taking the proper safety steps protects both you and your vehicle from potential harm. Working with brake fluid requires attention to personal protection, proper vehicle setup, and careful handling of a chemical that can damage skin and surfaces. Comprehending these precautions helps you complete the job confidently while minimizing risks.
Personal Protective Gear
Brake fluid can irritate your skin and eyes, so wearing the right protection is your initial line of defense. Put on nitrile gloves to keep the fluid off your hands, and consider wearing safety glasses to shield your eyes from splashes. Long sleeves and pants also offer an extra barrier, especially in case you’re working under the vehicle or reaching into tight engine spaces.
Some people choose to wear a shop apron as well, giving them a dedicated work outfit that keeps brake fluid away from everyday clothes. Should you get fluid on your skin, wash the area immediately with plenty of soap and water, and seek medical attention should irritation persist.
Vehicle Stabilization and Ventilation
Setting up your vehicle correctly prevents accidents and makes the flush safer and easier. Park on a level, hard surface like a driveway or garage floor, then engage the parking brake and shift into park in case you have an automatic transmission or into first gear for a manual.
Place wheel chocks behind the rear wheels to keep the vehicle from rolling, and only work on one vehicle at a time to avoid confusion. Crack open your garage door or work outside if conceivable, since brake fluid fumes can build up in enclosed spaces and cause headaches or dizziness. Good airflow helps you stay alert and comfortable throughout the job.
Handling and Disposal of Brake Fluid
Brake fluid is a hazardous substance that demands respectful handling from start to finish. Never pour old brake fluid down the drain or into the ground, as it contaminates water supplies and harms the environment.
Rather, collect all the old fluid in a sealed container and take it to a local auto parts store, recycling center, or hazardous waste facility that accepts used automotive fluids. Keep containers clearly labeled and store them away from children and pets until disposal day.
While working with new fluid, keep the bottle tightly sealed when not pouring to prevent moisture absorption, and never mix different DOT ratings of brake fluid, as they’re not compatible and can damage your braking system.
Personal Protective Gear
Surprisingly, one of the kindest things someone can do for themselves before a brake fluid flush is to suit up with simple, smart protective gear that keeps both skin and eyes safe.
Brake fluid is harsh, so having the right layer between it and the body helps everyone work with more confidence and calm.
- Wear chemical resistant gloves so fluid cannot dry or irritate the skin.
- Put on safety glasses or goggles to shield eyes from splashes and drips.
- Use old clothing or a shop apron that fully covers arms and legs.
- Keep a small trash bag or sealable container ready for soaked rags to improve disposal safety and protect the shared workspace.
Vehicle Stabilization and Ventilation
Getting the car ready for a brake fluid flush starts with making sure it’s sitting safely and the workspace is comfortable to breathe in. The vehicle should be parked on a flat surface for proper vehicle leveling, then supported with quality jack stands at the factory lift points. This helps everyone feel safer and more relaxed while working together around the car. Wheel chocks behind the tires add another layer of security, so the vehicle cannot roll.
At the same time, garage ventilation matters just as much. Opening the garage door, cracking side doors, and using a fan to move fresh air through the space keeps fumes from building up and helps everyone stay clear headed, calm, and focused on the job.
Handling and Disposal of Fluid
Once the car is safely supported and the air in the garage feels fresh and breathable, attention naturally turns to the brake fluid itself and how it is handled.
Brake fluid is tough on skin and paint, so care matters. Here’s how to keep things safe and green:
- Wear gloves and safety glasses to protect skin and eyes from harsh fluid.
- Catch every drop in a clean container; never pour old brake fluid down drains or onto the ground.
- Store used fluid in a sealed, labeled bottle away from kids and pets until it can be taken in for fluid recycling.
- Take the container to a local shop or recycling center that accepts automotive fluids for proper eco disposal.
Handling it right protects both people and the planet.
Step-by-Step Pre-Flush Setup and Reservoir Preparation
Before touching any brake lines or tools, getting the car ready and the brake fluid reservoir prepped is the quiet, vital step that makes the whole flush go smoothly. The vehicle should sit on a flat surface, in park or in gear, with the parking brake set and wheel chocks snug against the tires. This stable setup helps everyone feel safer and more confident.
Next comes gentle reservoir cleaning. The cap and area around it get wiped so no dirt falls inside. Then a simple fluid extraction tool, like a turkey baster, pulls out as much old fluid as possible.
Fresh, correct DOT-rated fluid is poured in up to the MAX line. The cap stays loosely in place, so air can move while the system is flushed.
Gravity Bleeding Method: How to Perform a Simple Flush
With the gravity bleeding method, a driver can perform a simple brake fluid flush using basic tools and a little patience, which often feels less stressful than more advanced methods.
In this section, the steps will walk through the tools and materials needed, how to open each bleeder and let the fluid flow safely, and how to watch pedal feel so the brakes stay firm and confident.
Through moving slowly from setup to final safety checks, the process helps the person feel in control while the car’s braking power becomes more steady and reliable.
Tools and Materials Needed
A simple gravity bleed starts with having the right tools and materials close at hand, so the person doing the job can stay calm, focused, and safe instead of scrambling for missing items.
With a small setup, the work feels smoother and more welcoming, especially for someone learning this skill.
- A basic set of bleeder tools and a box-end wrench that fits the bleeder screws.
- Clear hose and fluid containers so the person can see old fluid leave and keep the area clean.
- Fresh, correct DOT brake fluid and clean rags for quick wipeups and to protect paint.
- Jack, stands, wheel chocks, safety glasses, and gloves so the person feels protected and in control.
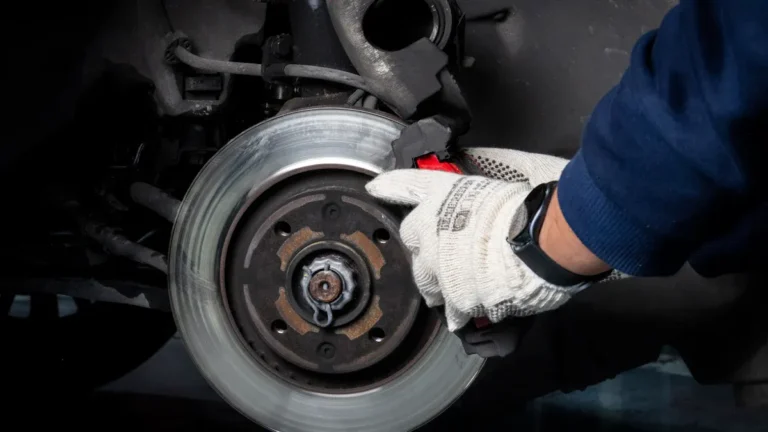
Step-By-Step Gravity Bleeding
Once the tools are laid out and the fresh fluid is ready, the gravity bleeding process begins as a calm, steady way to flush the system without rushing or pressure. The vehicle is safely supported, then each wheel’s bleeder valve is located and cleaned so grit does not get inside. Clear tubing slips snugly over the valve and runs into a catch bottle placed below, letting fluid gravity do the work.
As the valve cracks open slightly, old fluid and tiny bubbles start to drift out. The principal cylinder is checked often so it never runs low. Fresh fluid is added slowly, helping everyone feel in control and connected to the process.
| Step | Part | Purpose |
|---|---|---|
| 1 | Bleeder valve | Releases old fluid |
| 2 | Clear hose | Shows bubbles and color |
| 3 | Catch container | Collects used fluid |
Safety Checks and Pedal Feel
Fresh fluid flowing steadily from each bleeder is a good sign, but the real peace of mind comes from careful safety checks and how the brake pedal feels under your foot.
After a gravity flush, the driver should slow down, breathe, and confirm that everything is working before heading into traffic or any emergency braking.
- To begin with, they look closely for leaks around bleeder screws, hoses, and lines, since even tiny drips can lead to brake fading later.
- Then they press the pedal with the engine off; it should feel firm and hold steady.
- Next they start the engine and test again, checking for a consistent, confident pedal.
- Finally, they take a slow road test, building trust in the brakes with gentle stops before harder ones.
Pump-and-Hold Method: Two-Person Brake Fluid Flush
While it could sound like a job for a pro, the pump-and-hold method for a brake fluid flush is something many do-it-yourselfers can handle with a friend and a bit of patience.
One person stays at the brake fluid reservoir, keeping it filled and watching the fluid level. The other person sits in the driver’s seat and follows a simple pedal coordination technique.
The helper slowly pumps the pedal three to five times, then holds steady pressure. While the pedal is held, the person at the wheel opens the bleeder screw so old fluid flows out, then closes it before the pedal is released.
They talk through each step, repeat at every wheel, and check for a firm, confident pedal at the end.
Pressure and Vacuum Bleeding: Faster Professional-Style Options
At the time someone wants a faster, more consistent brake fluid flush, pressure and vacuum bleeders can feel like a real relief compared to the slow, two-person method.
With a pressure bleeder, the tool gently pushes fresh fluid through the system, which helps keep air out and gives steady flow for cleaner results and a firmer pedal.
A vacuum bleeder works from the other end through pulling fluid through each bleeder screw, and with a few careful habits such as watching for air leaks at the hose, keeping the reservoir topped off, and checking for clear, bubble-free fluid, it becomes a smooth one-person option.
Pressure Bleeder Advantages
- It improves time efficiency, so the flush finishes faster without rushing.
- It keeps pressure steady, which helps protect delicate ABS parts.
- It frees a person from pumping the pedal, so everyone feels more relaxed and included.
- It makes results more consistent, so the brake pedal feels firm and confident afterward.
Vacuum Bleeder Best Practices
Good contamination prevention also matters. They wipe dirt from each bleeder, crack the screw slowly, and watch for tiny bubbles that show trapped air leaving.
Between wheels, they check the primary cylinder so it never runs low. Through moving in this calm, patient rhythm, the vacuum bleeder helps the whole brake job feel cleaner, safer, and more in control.
Post-Flush Checks for Leaks, Pedal Feel, and System Operation
Although the hard work of flushing the brake fluid is finished, the job is not truly complete until the system is carefully checked for leaks, pedal feel, and proper operation. Technicians and vehicle owners should follow these essential verification steps to guarantee everything works safely:
- Close all bleeder valves securely and top off the master cylinder reservoir to the maximum line with fresh fluid
- Inspect every bleeder valve, brake line, and connection point for any signs of leaking or seeping
- Test pedal responsiveness with the engine off by pressing down firmly several times and checking that the pedal feels solid and doesn’t sink
- Start the engine and retest pedal responsiveness to confirm normal brake assist is functioning
Once these checks pass, take the vehicle on a cautious test drive in a quiet area to validate normal braking behavior. This leak identification process and pedal evaluation give drivers confidence that their braking system is ready for the road ahead.
When to Seek a Professional Instead of DIY Brake Flushing
Once the brakes pass all the post-flush checks, the next question is whether it is truly safe to keep handling this kind of work at home or whether it is time to let a professional step in.
A shop is the better choice whenever the vehicle has ABS or stability control that needs complex brake diagnostics, because concealed faults can be hard to see at home. In case the pedal still feels soft after bleeding, a technician can perform advanced bleeding with special tools.
Any leaking lines, rusty fittings, or seized bleeder screws also call for expert help. So do warped rotors, pulling while braking, or warning lights that will not turn off. In these moments, trusting a professional helps everyone feel safer and more supported on the road.
Tips to Maximize Brake System Life Between Fluid Flushes
Even between full brake fluid flushes, a brake system can stay strong and dependable whenever a driver builds a few simple habits into everyday use. Thoughtful parking habits protect brake components from unnecessary strain. Drivers should avoid holding the brake pedal down while stopped in traffic, as this creates constant pressure that wears out fluid faster.
Instead, using the parking brake on hills reduces stress on hydraulic lines.
Regular maintenance habits extend fluid life considerably:
- Check brake fluid color monthly to catch contamination at an early stage
- Avoid sudden, hard braking whenever possible to reduce heat buildup
- Drive smoothly on familiar routes to minimize brake demand
- Consider premium fluid additives that strengthen protective properties
These practices work together to keep brakes responsive and reliable longer.