I know how crucial properly adjusted brakes are for your safety and comfort on the road. Learning to adjust bike brakes is a simple, empowering skill. This valuable brake adjustment skill saves you both time and money. You avoid expensive shop visits. Look at the potential savings when you perform basic adjustments yourself compared to professional service:
Service / Part | DIY Parts Cost (per wheel) | Professional Labor Cost (per wheel) | Total Pro Cost (per wheel) |
|---|---|---|---|
Mechanical – Pad Replacement | $15 – $30 | $15 – $25 | $30 – $55 |
Mechanical – Cable/Housing | $10 – $20 | $20 – $30 | $30 – $50 |
Hydraulic – Pad Replacement | $20 – $40 | $20 – $30 | $40 – $70 |
Hydraulic – Brake Bleed | $25 – $40 (for bleed kit) | $30 – $50 | $30 – $50 (plus fluid) |
Rotor Replacement (Either) | $25 – $60+ | $15 – $25 | $40 – $85+ |
Full System Replacement | $50 – $100+ (Mechanical) | $75 – $150+ | $125 – $250+ |
You can achieve perfectly functioning brakes with these simple adjustments. I assure you, you can master this skill.
Bike Brake Basics and Tools
Types of Bike Brakes
I find understanding the different types of bike brakes very helpful. It makes any future adjustments much clearer. You will mostly encounter two main types: rim brakes and disc brakes. Rim brakes are common on many bikes. They use two brake arms with pads. A cable connects these arms to your brake levers. When I pull the lever, the pads press directly against the wheel’s rim. This friction slows the wheel down.
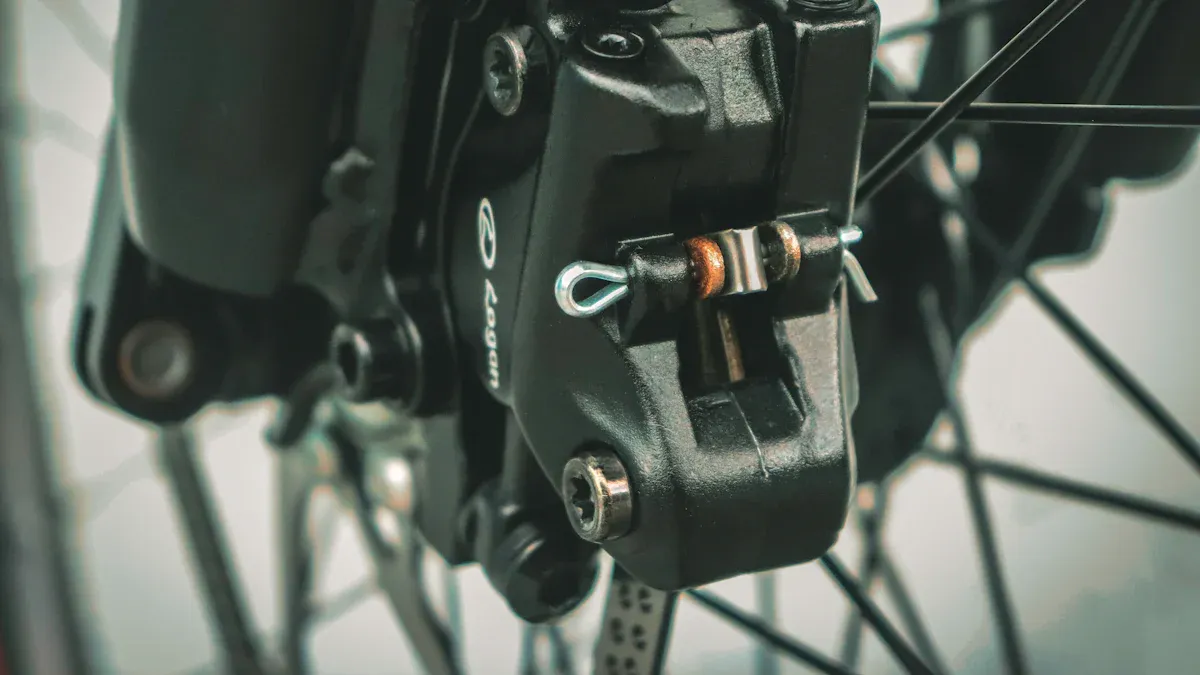
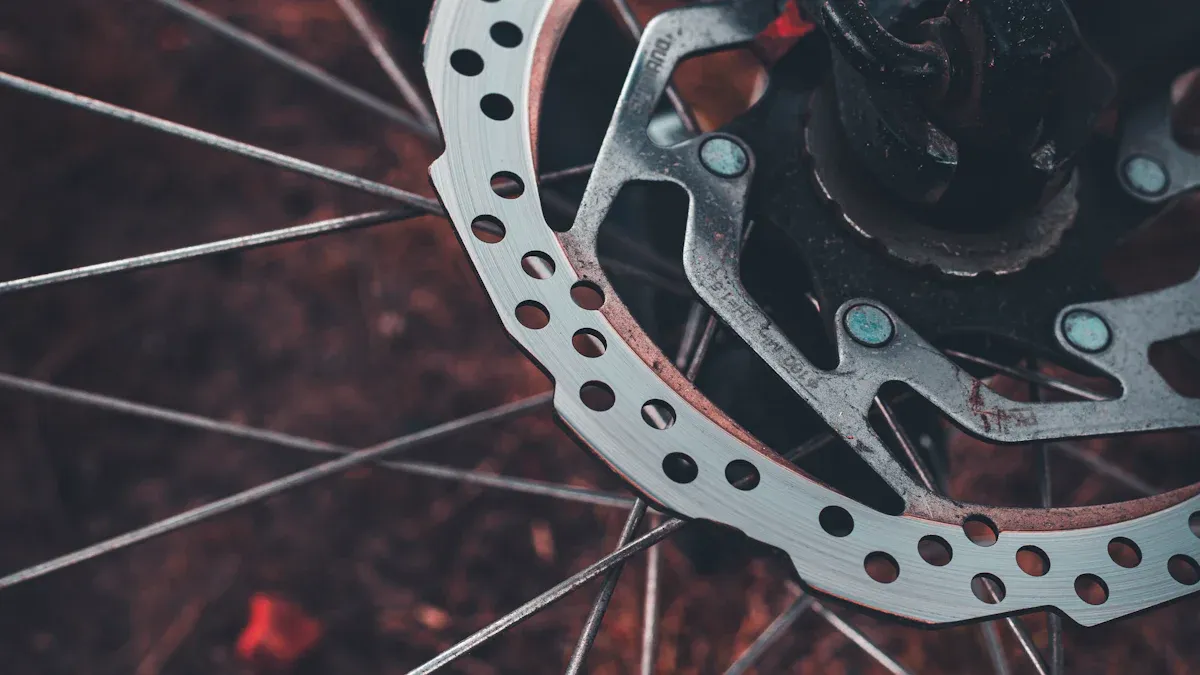
Disc brakes work differently. Their brake pads grip brake rotors. These rotors are on the hubs of your wheels. Calipers attach to your bike’s fork and frame. Larger discs usually give you better stopping power. Disc brakes come in two main forms: mechanical and hydraulic.
Mechanical disc brakes use a metal brake cable. This cable connects the brake lever to the brake caliper. When I pull the lever, the caliper clamps down on the rotor. Typically, only the outer pad moves. The inner pad stays still. Hydraulic disc brakes use a sealed system. This system goes from the lever to the caliper. It contains special fluid. When I pull the lever, it pushes fluid down a hose into the caliper. This fluid pressure moves both pistons together. They clamp down on the rotor. Both brake pads move simultaneously.
Essential Tools for Adjustments
You do not need many tools for most brake adjustments. I keep a few key items handy. You will definitely need Allen wrenches. A 4mm Allen key is often useful for brake work. A 5mm Allen key is also very common. I use it to loosen the pinch bolt on the brake caliper arm. You might also need Phillips and flathead screwdrivers. For rim brakes, cable cutters are sometimes necessary. Finally, I always have clean rags. They help keep things tidy, especially when dealing with brake dust or fluid.
How to Adjust Bike Brakes: Rim Brakes
Centering Your Wheel
A common issue with bicycle brakes is a dragging pad. This often results from a misaligned wheel. This misalignment can occur after I reinstall a wheel, for example, after fixing a flat tire. When the wheel is not centered, the brake cannot function correctly. Centering the wheel in the fork or frame is necessary to correct this problem before I adjust bike brakes.
I always start by centering the wheel. This ensures my brake adjustments are accurate.
I loosen the wheel.
I ensure the wheel is fully inserted into the fork (front wheel) or frame (rear wheel).
For the front wheel, I press down on the handlebars. For the rear wheel, I press down on the seat. This helps fully seat the wheel.
I tighten the wheel.
Brake Pad Alignment
Next, I focus on brake pad alignment. Proper alignment ensures maximum stopping power. It also prevents premature wear. I want the entire pad surface to contact the rim evenly.
Here is how I align the brake pads:
I loosen the pad mounting bolt or nut. I do not remove it completely. This allows the pad to move freely.
I apply the brake with one hand. With my other hand, I align the pad with the braking track on the rim. I make sure the pad is in line. It should only touch the braking track. I also ensure it is parallel. The entire surface should be in contact. It needs to be centered. I look for a uniform distance from the braking track when not applied.
Once I am happy with the pad position, I tighten the pad mounting bolts. I aim for approximately 5 to 7Nm.
To center the pads, I adjust the spring load on each brake caliper arm. I use a 2mm hex wrench or a Phillips head screwdriver. Turning clockwise increases spring load. It also increases the distance between the pad and rim. Turning anti-clockwise decreases it. I adjust both sides if needed to achieve centering.
Pad Clearance Adjustments
After aligning the pads, I set the pad clearance. This is the distance between the pad and the rim. I want enough clearance so the wheel spins freely. I also want the brake to engage quickly when I pull the lever.
I usually start by making sure the brake lever feels firm. If it feels too loose, I will need to adjust the cable tension. I look for about 1-2mm of space between each pad and the rim. This ensures good engagement without rubbing.
Cable Tension Adjustments
Cable tension is crucial for responsive braking. I use the barrel adjuster for small adjustments. This is a small knob usually found on the brake lever or the caliper itself. Turning it counter-clockwise increases cable tension. This brings the brake pads closer to the rim. Turning it clockwise loosens the cable. This moves the pads away.
Sometimes, the barrel adjuster is not enough. If my brakes are still too loose, I need to re-tighten the cable clamp. This indicates too much slack in the cable. It is a larger adjustment than fine-tuning.
I turn my barrel adjuster(s) almost all the way in (clockwise). I leave just one or two turns of thread showing.
I find the anchor bolt that pinches the brake cable to the brake caliper arm.
I use the correct tool. This is usually a 5mm Allen key or a small 8-10mm wrench. I loosen this bolt just enough for the cable to slide.
With one hand, I squeeze the brake pads against the rim. With my other hand, I pull the slack out of the cable. Then I re-tighten the anchor bolt firmly.
I release the brake pads. Now I can use the barrel adjuster for final fine-tuning. These adjustments help me get the perfect feel.
Centering Rim Brake Calipers
Finally, I center the rim brake calipers. This ensures both brake pads hit the rim at the same time. It also prevents one pad from rubbing. This is important for proper caliper alignment.
Caliper Brakes: I center these by rotating the entire brake assembly around its mounting bolt. I loosen the securing nut. I hold the bolt steady. Then I retighten the nut. For older or cheaper caliper brakes, the return spring is rigidly attached. Centering requires bending the spring or repositioning the brake shoes.
Cantilever Brakes (Shimano Style): Many Shimano-style cantilevers and linear-pull brakes have a small screw for fine balancing. This is typically on the left side for the front brake and the right for the rear. This screw adjusts spring tension.
Cantilever Brakes (Dia Compe Style): These often use a separate spring block. This block goes onto the boss. It has a hole for the spring end. I loosen the bolt holding the cantilever. I rotate the spring block with a cone wrench (usually 13mm) to get the desired tension. Then I tighten the bolt. Some models have adjustable spring blocks on both sides. Others only have one.
General Spring Adjustment (Cantilever Bosses): Newer bicycles with cantilever bosses often have three small holes next to the boss. These anchor the return spring. Choosing the top hole gives the highest tension. The bottom gives the lowest. The middle hole is common. Both sides should use the same position.
Non-Adjustable Springs (Older/Cheaper Brakes): If adjustment is needed, I physically deform the spring. This can involve unhooking the transverse cable. Then I force the brake arm outward. Or I bend the spring after unhooking it. Alternatively, I adjust the brake shoe stud. Or I reposition washers on a threaded stud.
How to Adjust Bike Brakes: Disc Brakes
I find disc brakes offer powerful and consistent stopping. They work well in all weather conditions. Understanding their types helps me make the right adjustments.
Disc Brake Types
I see two main types of disc brakes on bikes: mechanical and hydraulic. They both use a rotor attached to the wheel hub. Calipers clamp onto this rotor to slow the bike. The way they transmit force from the lever to the caliper is different.
Here is a quick comparison of their key operational differences:
Feature | Mechanical Disc Brakes | Hydraulic Disc Brakes |
|---|---|---|
Force Transmission | Uses a metal cable to actuate the caliper. | Uses fluid pressure (DOT fluid or mineral oil) in a sealed system. |
Pad Actuation | Typically, the outer pad moves, while the inner pad is stationary. | Both brake pads move simultaneously. |
Lever Action | Lever pulls a cable, which actuates the caliper. | Lever pushes a plunger, moving fluid to the caliper, which moves pistons. |
Self-Adjustment | No self-adjustment; requires manual adjustments as pads wear and cables stretch. | Self-adjusts as pads wear, maintaining consistent lever feel. |
Pad Wear | Uneven pad wear due to single pad movement. | Even pad wear due to simultaneous pad movement. |
Maintenance | More frequent adjustments needed due to cable stretch and uneven wear; simpler tools. | Less routine maintenance; requires specific bleed kits for service. |
Stopping Power | Generally lower stopping power. | Higher stopping power with less lever force. |
Cost | Lower initial and maintenance costs. | Higher initial cost. |
Mechanical Disc Brake Adjustments
I often work with mechanical disc brake systems. They need regular attention to cable tension and pad clearance.
First, I adjust cable tension. If my brake lever feels too soft, or I can pull it all the way to the handlebar, I know I need to increase tension. I move the stationary pad closer to the rotor.
Here is how I adjust the cable tension:
I turn the barrel adjusters fully clockwise. I do this at both the lever and the caliper. This puts them all the way in.
I ensure the lever arm is in its relaxed position. I loosen the cable pinch bolt to allow full lever arm travel.
I pull the cable taut. This removes any slack. Then I tighten the cable pinch bolt. I am careful not to move the lever arm while tightening. Its useful motion range is limited.
If the cable is too loose for other adjustment methods, I loosen the bolt clamping the cable to the caliper. I pull the cable tight. I use pliers for a better grip. Then I re-tighten the clamp.
After re-tightening the cable clamp, I use the barrel adjuster on the lever or caliper for fine-tuning the tension.
Using the barrel adjuster to compensate for worn brake pads can lead to the lever arm contacting the caliper body before the pads engage the rotor. This results in a complete loss of braking. I always make sure my pads are not too worn.
Next, I adjust pad clearance. Mechanical disc brakes typically have an inboard pad that is fixed or adjustable during setup. An outboard pad moves when I actuate the brake lever. Some outboard pads have independent adjustability via a dial. Others do not. They rely on caliper arm rotation for adjustment. My goal is to align the pads squarely with the rotor. I also ensure the inboard pad protrudes enough for full clamping.
I follow these steps for pad clearance alignment:
I run the inner pad all the way in towards the rotor until it is touching.
I loosen the caliper adjustment bolts slightly.
I squeeze the brake lever. This allows the caliper to self-position against the rotor.
While holding the lever squeezed, I tighten the adjustment bolts.
I release the lever. I back off the inner pad until it no longer rubs.
I visually inspect for a small amount of daylight between the rotor and both pads. I use a white sheet of paper behind the caliper if I need better visibility.
If the brake lever feels too loose, I tighten the inner pad slightly more. This reduces clearance. Or I use barrel adjusters to remove cable slack without affecting the brake’s full range.
To adjust the inner pad, I use a 4mm Allen wrench. I insert the wrench into the adjustment bolt. I twist counter-clockwise to increase clearance. I check clearance after each ‘click’. This is approximately a quarter rotation. I avoid excessive adjustment. My objective is to eliminate brake rub. I also ensure solid pad contact when the lever engages.
Centering Disc Calipers
Proper caliper alignment is key to preventing annoying rotor rub. I always start by ensuring my wheel is properly seated. For bikes with quick-release levers or axle nuts, I loosen them. I apply downward pressure on the bike. This ensures frame and axle contact. Then I re-tighten them.
Here is how I center the disc calipers:
I check for pad/rotor rub. I elevate the bike. I spin the wheel. I visually inspect the gaps between the rotor and pads. Backlighting the caliper can enhance visibility.
If rubbing persists after initial alignment, I spin the wheel. I loosen one caliper bolt. I gently push the caliper in the direction of the rub. I do this until a gap is visible on both sides of the rotor. I exercise caution near the spinning wheel. If necessary, I repeat the procedure with the other bolt.
Once rubbing stops, I fully secure both mounting bolts. I typically tighten them to 6–8 Nm.
Hydraulic Brake Considerations
Hydraulic brakes offer excellent power and modulation. However, their internal fluid system means some maintenance tasks are more complex. Bleeding the brakes, for example, involves removing air from the fluid lines. This is often best left to a professional. It requires specific tools and knowledge.
A simpler fix for a loose-feeling hydraulic lever is adjusting the lever reach. Many hydraulic brake levers have a small screw or dial behind the lever blade. I use a 2.5mm Allen wrench to adjust this. Turning it changes how far the lever sits from the handlebar. This can make the brake feel more responsive. It does not affect the actual pad clearance or braking power. It just changes the starting position of the lever.
Testing Your Brake Adjustments
After I make any brake adjustments, I always perform two crucial tests. These tests confirm my work. They ensure my brakes are safe and effective. I want to feel confident when I ride.
The Lever Pull Test
I start with the lever pull test. I stand next to my bike. I squeeze each brake lever individually. I check for a few things. First, the wheels should spin freely. I listen for any rubbing sound from the brakes. If I hear rubbing, I know I need to recheck my pad alignment or caliper centering. The lever should also have some free travel before the pads engage the rim or rotor. This means the lever moves a little before I feel resistance. I avoid over-tightening the cable. Over-tightening can cause brakes to drag. This wears out pads quickly. It also makes pedaling harder.
I also pay attention to the lever’s stopping point. I want maximum available travel. The lever should not bottom out against the handlebar. This compromises my control. I also avoid setting my brakes to a ‘hair trigger.’ This is not the most effective setting. I aim for a firm, responsive feel.
The Roll and Stop Test
Next, I perform the roll and stop test. I find a safe, open area. I gently roll my bike forward. I apply each brake separately. I observe how the bike stops. I want a smooth, controlled stop. The wheel should not skid unexpectedly. I also check for any unusual noises. I make sure the bike stops in a straight line. It should not pull to one side. This test helps me confirm my final adjustments. It ensures both brakes work well under actual riding conditions. If I notice any issues, I go back and make further final adjustments. This ensures my safety on the road.
Troubleshooting Common Brake Adjustments Issues
Even after making careful adjustments, I sometimes encounter issues. Knowing how to troubleshoot these common problems helps me get back on the road quickly.
Spongy Brakes
If my brake lever feels soft or “spongy,” I know something is not quite right. For rim brakes and mechanical disc brakes, a common culprit is loose cables. The cable might have stretched, or the anchor bolt might not be tight enough. In mechanical disc brakes, I find that if the stationary pad is not adjusted as close to the rotor as possible, the moving pad has to push the rotor further. This uses up significant lever travel and makes the brake feel spongy. Also, damaged or kinked cable housing can act like a spring. This wastes my lever travel and creates that spongy feeling.
For hydraulic disc brakes, the issue is usually different. Air in the brake line is the most common cause. Air prevents proper brake fluid flow, leading to a soft pedal. Corroded brake lines can also create small holes, causing fluid leaks and a loss of hydraulic pressure. Leaking disc brake calipers or master cylinder leaks can also cause an extremely low brake pedal.
Rubbing Brakes
When I hear my brakes rubbing, it is annoying and slows me down. For rim brakes, improper wheel placement is a frequent cause. The wheel might not be centered and tightened correctly in the frame. This makes the brake drag all the way around the rim. If the brake touches only periodically, the wheel itself might have an issue, like spoke tension. Brake centering issues also cause rubbing. One side might not open as much as the other.
This happens if the wheel moves after I put it back on. Sometimes, the cable section running from the brake to the frame can tug on the arm it is attached to. If this cable moves or is bumped, it can alter the balance of the brake arms. Friction in the pivot area of the brake arms can also unbalance the system. I often oil these points to resolve the issue. Worn brake pads can also cause rubbing. As the pad wears, it might contact the rim further from the tire. This can create a ridge on the pad that snags the rim, preventing proper release.
Squealing Brakes
Squealing brakes are loud and can be embarrassing. For rim brakes, pad misalignment is a common reason for squealing. This leads to vibration. The rigidity of components also plays a role. For disc brakes, several things can cause squealing. Worn brake pads are a big one. When the pad wears down to about ⅛” of material, mechanical-wear indicators can touch the rotor. This makes a loud squeal. Damaged pad clips also cause squealing. These clips secure the pad and reduce vibrations. If they lose tension, the pad can vibrate. Insufficient lubrication around the pins that attach the brake pad to the caliper cavity can also lead to squealing. Loose hardware, like calipers or rotors, can vibrate and create noise. Improper break-in procedures for new brakes can also cause squealing. Finally, overheating can glaze the pad and rotor. This makes them very smooth and causes squeaking.
I hope this guide empowers you to adjust bike brakes with confidence. Mastering these simple adjustments significantly enhances your riding safety and enjoyment. Regular maintenance, including brake checks, is crucial for bicycle safety. It addresses potential issues before they become serious. I encourage you to perform regular checks on your bike’s braking system. This ensures your brakes work correctly. A well-maintained bike guarantees safety on the road or trail. You can maintain your bike and ride safely.