Changing the oil in a Jeep’s rear driveline module keeps things running smoothly and helps prevent costly repairs down the road. It’s a job anyone can tackle with the right tools and a little patience. Starting with a cool engine and level ground sets the stage for a clean, safe process. Gathering gear oil, a pump, and safety supplies makes the task easier and less messy. Understanding what to expect and how each step connects helps build confidence and makes the whole experience feel more rewarding.
Preparation and Safety Measures
Before changing the oil in a Jeep rear differential, careful preparation and safety steps are essential to guarantee the process goes smoothly and without injury. Park the vehicle on level ground and let the engine cool to avoid burns from hot fluids.
Gather all tools like an oil drain pan, shop towels, a brush, a fluid pump, and a torque wrench. Always wear protective gloves and select proper eyewear to shield your eyes from splashes.
Keep a fire extinguisher nearby as a precaution against accidental spills near hot surfaces. Make sure the vehicle is securely supported when raised for access.
Double-check that all fasteners are within reach and in good condition. These steps help promote a safe, efficient, and confident oil change experience.
Required Fluid Specifications
Choosing the right oil for a Jeep rear differential makes a real difference in how smoothly the gears run and how long the parts last. Using the correct viscosity grades and ensuring additive compatibility are key for peak performance. Always pick a GL-5 rated gear oil, as GL-4 oils can damage hypoid gears. Synthetic oils offer better protection and last longer, especially under heavy loads or extreme conditions. Check your owner’s manual or axle tag for exact specs, but most Jeeps need 75W-90. Using the wrong oil can cause noise, wear, or even gear failure.
| Fluid Type | Viscosity Grade | Additive Compatibility |
|---|---|---|
| Mineral | 75W-90 | GL-5 |
| Synthetic | 75W-90 | GL-5 |
| Heavy Duty | 75W-140 | GL-5 |
Fluid Capacity and Quantities
The rear differential fluid capacity in most Jeep models is generally around 1.75 quarts, but it can vary depending on the specific model and differential size.
For instance, Rubicon models typically require closer to 2.0 quarts due to their larger differential assemblies.
It’s wise to purchase fluid in packaging sizes of at least 2 quarts to guarantee an ample supply for a complete fill, allowing some margin for topping off after a test drive.
While comparing cost, buying in larger quantities or synthetic 75W-90 GL-5 gear oil often offers better value and longer-lasting performance, despite a slightly higher upfront price.
Be mindful not to overfill, as excess fluid can lead to leaks, and always verify the fluid level at the fill plug to safeguard proper lubrication.
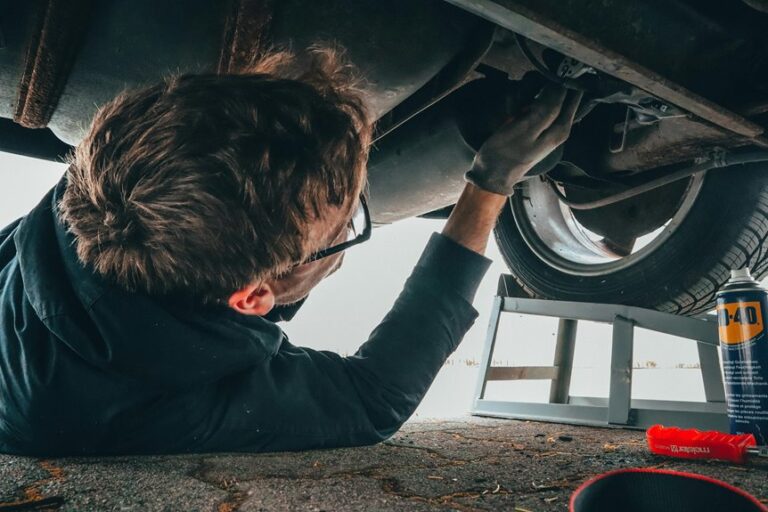
Drain and Fill Procedure
Start with loosening the fill plug on the rear differential to allow easy access for refilling after draining the old oil. This step guarantees you won’t be stuck with nowhere to put new fluid in case the fill plug is seized. Next, remove the drain plug and let all the old gear oil drain into a catch pan. Patience matters here — wait until the flow slows noticeably, ensuring you pump out as much old fluid as possible.
Use careful pump techniques with a fluid pump to control fill speed during refilling. Filling too fast can cause spills or air pockets, while too slow wastes time. Fill until the oil just reaches the bottom edge of the fill hole.
| Step | Action |
|---|---|
| Loosen Fill Plug | Confirm fill access |
| Drain Oil | Remove drain plug carefully |
| Pump Oil In | Control fill speed precisely |
This approach safeguards proper lubrication and prevents leaks.
Additional Maintenance Steps
Although the drain-and-fill process takes care of the main job, extra attention to a few additional steps not only deepens the connection with your Jeep but also helps catch small problems before they turn into major headaches.
After draining the oil, cleaning the breather keeps that pressure inside the differential stays balanced, preventing leaks and contamination. Meanwhile, a careful u joint inspection can reveal initial signs of wear, such as looseness or rust, that could cause drivetrain vibrations or failures when neglected.
Checking the condition of drain and fill plugs for damage, and replacing gaskets or seals while removing the differential cover, avoids leaks.
Additionally, examining the drained oil for metal shavings offers clues about internal gear wear, guiding maintenance decisions before costly repairs become necessary.
Post-Service Checks and Tips
After topping off the fluid, it’s smart to take the Jeep for a short test drive to let the new oil circulate through the gears.
Once back, check under the vehicle for any signs of leaks around the plugs or cover, and make sure the fluid level is still right at the fill hole. These quick checks help catch small issues promptly and give peace of mind that the job was done right.
Leak Inspection
How does a freshly serviced differential feel after a fluid change? It should run smoothly and quietly, with no leaks or odd noises.
To confirm this, be sure to perform a thorough leak inspection, paying attention to sealant compatibility in case a RTV or gasket maker was used during reassembly.
Using a UV dye in the gear oil can help identify slow or concealed leaks while inspected under a UV light.
Check the differential housing, drain and fill plugs, and surrounding seals for any signs of seepage or fluid accumulation.
Watch for drips after a short test drive.
Incompatible sealants or improper application can cause leaks, so make sure all surfaces and plugs are clean and properly torqued.
This careful inspection confirms the service was successful and the differential remains protected.
Fluid Level Check
What exactly should be checked while verifying the fluid level after servicing a Jeep RDM (rear differential)?
The owner should verify the oil reaches the bottom of the fill hole, not above it, to prevent leaks or damage.
After refilling, a short test drive helps circulate the new fluid and stabilize the level.
Visual verification is key—look for any drips or seepage around the plugs and cover.
Sensor calibration is not required for manual checks, but always double-check the level once the vehicle is cool.
Should the oil appear low, top it up carefully.
Rechecking after driving reassures everything is sealed and working right.
This step keeps the differential happy and helps avoid future headaches.
Test Drive Monitoring
A careful test drive lets the new differential fluid spread evenly through the gears, ensuring proper lubrication right away.
During this phase, *temperature logging* is key, as monitoring the differential’s warmth reveals whether the fluid circulates correctly without overheating. Excess heat may signal improper fluid levels or internal friction.
Alongside, *noise analysis* helps detect unusual sounds like grinding or whining, which can indicate worn components or insufficient lubrication. Drivers should listen attentively and record any irregular noises that were not present before the fluid change.
After completing the drive, checking the fluid level again confirms no leaks or losses have occurred. This combined approach sharpens insight of the differential’s health and verifies the maintenance was successful, minimizing the chance of undetected issues that could cause costly damage.