You’re seeing the check emission system light and you can act fast without panicking. Initially check the gas cap for cracks or looseness and tighten or replace it, since small leaks often trigger the light. Next listen for rough idle, stalling, or poor fuel economy that point to a bad oxygen sensor. Smelly exhaust, rattles, or loss of power might mean the catalytic converter. Plug in an OBD-II scanner for codes, try simple fixes, and in case the issue persists seek a trusted mechanic to avoid bigger damage — keep going to learn practical next steps.
Understanding the Check Emission System Light
In case your Check Emission System light comes on, don’t panic; it’s your car’s way of telling you it needs a closer look. You belong to a group of drivers who care for their ride, and that light is one of the warning signals that helps you act before things worsen.
You’ll notice different light meanings depending on how steady or flashing the indicator is, and understanding those cues brings calm.
Start by observing patterns, listening for unusual sounds, and tracking recent fuel or performance changes. That builds background for the next steps and connects you with technicians or friends who can help.
You’ll feel supported once you share clear details, because you’re not alone in handling these signals.
Common Immediate Causes to Inspect First
Once your check emission system light comes on, start with inspecting a few simple parts you can handle right away. You’ll want to check the oxygen sensor because a bad sensor often makes the engine run poorly and raises emissions.
You should also tighten or replace a loose gas cap since it’s a common, easy fix that can clear the light. These two checks link directly to fuel and air control, so fixing them often stops further worry and keeps you from spending more time or money than needed.
Oxygen Sensor Failure
Oxygen sensors stop working for a few common, easy-to-check reasons that you can inspect initially, and grasping these makes the problem feel less scary. You want clear steps so you can join others who’ve fixed this without stress. Check sensor calibration beforehand because a misread oxygen sensor throws off fuel trim and triggers the light. Also look for heater malfunction since many sensors rely on a heater to reach operating temperature quickly.
| Item inspected | What to look for | Quick action |
|---|---|---|
| Wiring | Frays, corrosion | Repair or replace |
| Connector | Loose fit, dirt | Clean and secure |
| Sensor body | Contamination | Replace provided fouled |
| Heater | No power | Test circuit and fuse |
These checks connect directly to engine performance and feel reassuring to do together.
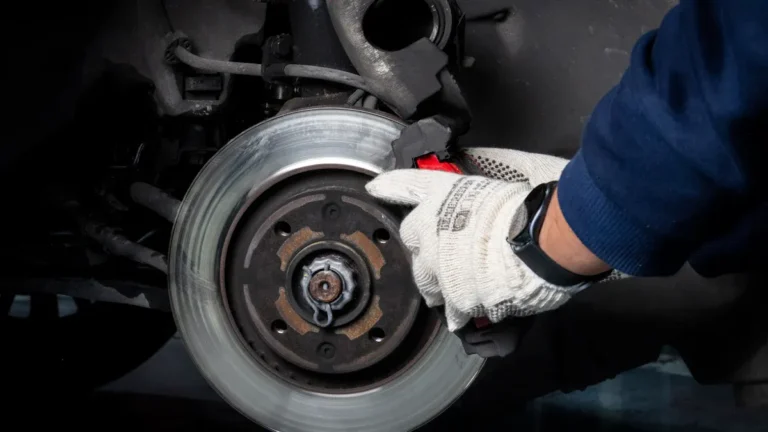
Loose Gas Cap
You’ve already looked at sensors and wiring, so now let’s check the simplest thing that often causes the check engine light to come on: a loose gas cap. You could feel silly, but you’re part of a group that cares and helps each other, so this quick step matters.
Initially, identify gas cap types on your vehicle. Some screw on, some click into place, and some have a tether. Inspect the cap for cracks, worn seals, or missing pieces.
Next, try tightening techniques that work: push in, turn until it clicks, or hand-tighten firmly should no click exist.
After tightening, wait a few drives for the system to reset. In case the light stays on, keep going with other checks you trust.
How a Loose or Damaged Gas Cap Triggers the Warning
Should your gas cap be loose, cracked, or missing, your car’s system will often spot the problem and light the check emission system warning, and that can feel annoying or worrying just as you need a calm, clear fix. You and I both want simple answers. A bad cap lets vapors escape and changes emission pressure in the fuel tank. The car senses that drop and flags it. You can try gas cap replacement, tighten the cap, or inspect the seal. Should it persist, your friendly mechanic can run a quick test.
| Problem | What you feel | Simple step |
|---|---|---|
| Loose cap | Annoyed | Tighten cap |
| Cracked cap | Worried | Replace cap |
| Missing cap | Upset | Buy new cap |
Oxygen Sensor Failure: Symptoms and Risks
Should your check engine light comes on and you notice your fuel mileage dropping, your oxygen sensor could be the cause. You’ll want to get it checked soon because a failing sensor can throw off the engine’s air-fuel mix and leave you paying more at the pump.
I know it’s annoying, but catching this promptly can save you money and spare you from larger repairs down the road.
Check Engine Light On
Reflecting on why that little check engine light just turned on and won’t go away? You’re not alone and you’re allowed to feel a bit uneasy. Start initially running engine diagnostics or visit a friendly shop so they can read error codes. That simple step shows you what’s wrong and helps you decide next steps together.
- You could see poor idling or rough runs that point toward an oxygen sensor problem.
- A failed sensor can upset fuel trim and emissions without being dramatic initially.
- Ignoring it can lead to more costly repairs later and leave you feeling isolated with the worry.
- Sharing your concerns with a trusted mechanic builds confidence and keeps your car and community safer.
Take action and stay supported.
Poor Fuel Economy
Noticing your fuel gauge dipping faster than usual can feel frustrating and a little personal, like your car is quietly taking your money. You and your friends who care about their cars will want clear answers.
An oxygen sensor failure often raises fuel consumption because the engine gets wrong air fuel data. That causes the computer to overfuel, and you’ll experience a mileage drop on drives you used to nail.
Observe rough idling, stalling, or a smell of gas, and those signs connect to poorer economy. You can check codes with a reader, swap sensors provided you like DIY, or join a trusted shop for help.
Taking action now helps you save money and keeps your car running with the group you belong to.
Catalytic Converter Problems and What They Mean
Have you ever been curious why your car suddenly smells like rotten eggs or why the check engine light won’t go off? You could be facing converter degradation in your catalytic converter. You’re not alone. Many drivers feel worried and want clear, friendly guidance.
The converter houses emission catalysts that turn harmful gases into safer ones. Whenever it fails, you’ll notice odors, poor acceleration, or louder exhaust. Here are signs and next steps you can take together with a trusted mechanic.
- Strange rotten egg or sulfur smell from the exhaust
- Reduced power, stalling, or hesitation during acceleration
- Rattling noises from under the vehicle whenever cold or idling
- Persistent check engine light with emission-related codes
We’ll help you understand repair or replacement choices and what each means for your car.
Engine Misfires: Why They Affect Emissions
At the time your engine misfires, it can send unburned fuel straight into the exhaust and raise emissions during hurting performance.
Often the trouble starts with a worn spark plug, a clogged or leaking fuel injector, or ignition timing that’s off, and each one messes with how completely the fuel burns.
Let’s look at how those parts work together so you can spot the real cause and get cleaner running without guessing.
Spark Plug Failure
In the event a spark plug fails, your engine can start to miss and you’ll feel it right away as rough idling, hesitation, or a loss of power. You care about your ride and you’re not alone in wanting it to run clean.
A bad spark plug stops consistent cylinder firing and can overload the ignition coil, which raises emissions and stresses nearby components. You’ll want to inspect plugs and coils together since they work as a team.
- Check plug gap and electrode wear for visible damage
- Swap a suspect plug with a known good one to isolate the issue
- Inspect ignition coil boots and connections for cracks or corrosion
- Replace plugs at recommended intervals and use the right heat range
Fuel Injector Problems
In case a fuel injector is clogged, leaking, or spraying unevenly, your engine will start missing and you’ll observe it quickly through rough idling, hesitation, or a shaky idle that makes driving stressful. You’ll feel worried, and that’s okay because many drivers face clogged injectors.
Whenever an injector won’t deliver fuel correctly, one cylinder lags and the car emits more pollutants. You want simple steps that help you and others in your group of drivers. Start with injector cleaning using a quality cleaner or professional service to restore spray pattern and balance.
You can also inspect fuel lines and seals, replace faulty injectors, and monitor performance after repairs. Together, you’ll reduce misfires, improve mpg, and cut emissions.
Ignition Timing Errors
Clogged or leaking fuel injectors can make one cylinder weak and raise your emissions, and similar imbalance can come from wrong ignition timing, which also makes the engine misfire.
You’ll notice rough idling, loss of power, and higher tailpipe readings whenever timing adjustment is off. That stresses your catalytic converter and leaves you worried about repair costs, but you’re not alone and you can fix this.
- Check spark plug condition and replace worn plugs promptly
- Inspect distributor or cam sensor for signs of wear or damage
- Perform timing adjustment using a timing light or scanner tool
- Verify ignition advance settings per manufacturer specs
These steps connect misfire symptoms to timing faults and guide you through practical, friendly troubleshooting.
Mass Air Flow Sensor Issues and Simple Tests
In case your car feels fussy or runs rough, you could have a problem with the mass air flow sensor, and that can make you worry about costly repairs; don’t panic, because many issues are simple to find and fix.
You could belong to a group of drivers who care for their ride and help each other. Sensor contamination is common from dust or oil and makes readings unreliable. Check for dirt and clean gently with the right spray.
You can watch for voltage fluctuation with a multimeter while the engine idles. Swap the connector and test again to see whether wiring or plug is the issue.
In case the sensor still misreads, loan or borrow a known good unit to compare. You’ll feel better realizing you tried these friendly steps.
EVAP System Leaks: Detecting Fuel Vapor Loss
You’ll often find EVAP leaks at simple spots like loose gas cap seals, cracked hoses, or the charcoal canister, and understanding these common locations helps you spot trouble faster.
In case you suspect a leak, a smoke test lets you watch where vapor escapes so you can target repairs with confidence. Also check the purge valve since it can stick or fail and cause false leak signals, so testing it ties directly into the smoke test findings.
Common Leak Locations
- fuel tank seams and straps
- filler neck and cap seal
- charcoal canister connections
- hoses and vacuum lines near the purge valve
Smoke Test Use
Want to find a sneaky EVAP leak without tearing the car apart? You can use smoke testing for reliable leak identification. You and your friends will feel confident watching gentle smoke fill the EVAP lines while you listen and look for escaping vapor.
The tool pumps harmless smoke in at low pressure, so you won’t stress hoses or seals. You’ll inspect fuel tank fittings, filler neck, and charcoal canister connections as smoke reveals weak spots.
Should smoke appear around a clip or rubber boot, you’ll know where to fix or ask for help. Smoke testing brings the group together, because it’s clear and fair. You’ll leave with proof, a plan, and less worry about smells or warning lights.
Purge Valve Issues
After you watch smoke trace out obvious cracks and loose fittings, the purge valve can be the sneaky part still causing trouble. You feel let down whenever a tiny valve makes a check emission light stay on, and you want clear steps to join others fixing it.
Start with purge valve diagnostics to see whether the valve clicks, holds vacuum, or leaks under pressure. Provided tests fail, consider purge valve replacement with parts you trust and help from a friend or tech.
- Listen for the faint click while the engine runs
- Use a hand pump to check for vacuum hold
- Inspect hoses for brittleness and loose clamps
- Swap in a known good valve to confirm fault
You’re not alone in this repair.
Exhaust Leaks and Their Impact on Emissions Readings
In case you smell exhaust or see soot near a joint in the pipes, don’t ignore it because small leaks can change your car’s emissions readings and cause real headaches at inspection time. You want to protect your ride and your community, so check the exhaust manifold and watch for tailpipe corrosion. Leaks let oxygen in and crash sensor readings. That confuses the computer, raises emissions, and can fail tests you need.
| Feeling | Action |
|---|---|
| Worried | Inspect joints |
| Relieved | Tighten clamps |
| Connected | Ask friends for help |
| Confident | Replace rusted sections |
Reach out to your trusted group in case a leak feels big. You’re not alone, and simple fixes often restore calm and pass rates.
Fuel System Faults That Can Illuminate the Light
Curious why that check engine light suddenly comes on and stays lit? You could feel worried, but you belong here and we’ll walk through fuel system faults that trigger it. Problems in the fuel pump or a clogged fuel filter change pressure and finicky performance.
You’ll notice rough idling, hesitation whenever you accelerate, or stalling. Tackling these helps emissions and your peace of mind.
- Weak fuel pump causing low pressure and misfires
- Dirty fuel filter restricting flow and straining the pump
- Intermittent pump failures creating hesitation or stalls
- Contaminated fuel causing clogged injectors and load on the pump
These items connect because they all lower fuel delivery. Start out checking filter condition then inspect pump operation to find the root cause.
Using an OBD-II Scanner to Read Trouble Codes
You’ve checked the fuel pump and filter and you’re still left questioning why the light stayed on. You can plug an OBD-II reader into the port under the dash. It lets you and your community of drivers see stored trouble codes fast.
OBD II benefits include clear code readouts, freeze frame data, and live sensor values that point you toward the problem. You’ll feel supported whenever you compare codes with trusted guides or ask a friend for help.
Keep in mind Scanner limitations too. A code names a symptom not the root cause. You still need basic knowledge to interpret codes and avoid chasing parts. Use the scanner to guide next steps and bring evidence once you visit a mechanic so you stay part of the solution.
DIY Checks and Quick Fixes You Can Try at Home
Curious what you can safely try at home to clear that emission light and feel more in control? You’re not alone, and you can handle a few checks that often help.
Start upon inspecting hoses for vacuum leaks and replace cracked lines. Next, look at visible wiring to sensors and gently clean connectors to help sensor calibration stay accurate. You’ll feel supported taking small steps together.
- Check and tighten the gas cap; a loose cap mimics bigger problems
- Inspect intake hoses for cracks or splits that cause vacuum leaks
- Clean mass airflow and oxygen sensor connectors for better sensor calibration
- Use a basic OBD-II reader to clear codes after fixes and watch whether light returns
These steps build confidence and keep you connected to your car.
When to Drive Carefully vs. Stop Immediately
After you try simple fixes like tightening the gas cap or clearing a code, you’ll want to know whether the car is safe to keep driving or in case you should pull over right away.
In the event you feel slow acceleration, lose power, or see heavy smoke, pull over once it’s safe. Those signs mean the engine might be stressed and could worsen quickly. Should the check emission light blinks, stop immediately and turn the engine off to avoid damage.
On the other hand, in case the car runs steady with mild hesitation, steer gently, use slow acceleration and gradual deceleration, and head home or to a shop.
Trust your instincts and call for help should you feel unsure. You’re not alone and it’s okay to ask for support.
Finding the Right Mechanic and Estimating Repair Costs
Need help finding a mechanic who won’t overcharge or make you feel uneasy? You’re not alone and you deserve clear help. Start out by checking mechanic credentials like certifications and local reviews so you trust who’s working on your car.
Ask for written repair quotes and compare them. Bring a friend or family member in case that makes you calmer.
- Ask about warranties and parts sources
- Request a step by step estimate and timeline
- Verify shop insurance and certifications
- Get a second opinion once quotes differ
These steps build safety and belonging. Once quotes vary, talk through differences with the mechanics. That creates trust and helps you pick someone who respects your budget and treats you like part of the community.