

When your dashboard battery light illuminates, it signals a serious issue. This car battery light usually indicates a problem with your car’s electrical charging system, not just the battery itself. You need to act fast to prevent a breakdown. This issue could involve the alternator, voltage regulator, or the battery. Many car breakdowns stem from these problems.
A faulty alternator can lead to significant costs; an alternator replacement averages between $700 and $1,000. This post provides 12 emergency checks. These checks help you diagnose alternator problems. You can safely perform many initial checks yourself to pinpoint a bad alternator.
Key Takeaways
The dashboard battery light means a problem with your car’s charging system, not just the battery.
Act fast when the battery light comes on to prevent breakdowns and safety risks.
Check battery terminals, alternator belt, and listen for strange noises to find problems.
Use a multimeter to test battery voltage when the engine is off and when it is running.
Seek professional help for complex issues or if you are unsure about your findings.
Understanding the Battery Warning Light
What the Dashboard Battery Light Indicates
When your dashboard battery light turns on, it does not always mean your battery is bad. This battery warning light signals a problem with your car’s entire charging system. This system includes the alternator, the voltage regulator, and the battery itself. Many things can cause this light to appear. For example, your battery might be old. Batteries typically last 3-5 years. An old battery struggles to hold a charge. You might notice slow engine cranking or dim headlights. Electrical system malfunctions can also trigger the light.
This includes short circuits or bad fuses. You might see flickering lights or inconsistent radio performance. Alternator issues are a common cause. A bad alternator cannot charge the battery while the engine runs. This causes the battery to drain quickly. You might hear a whining noise from the engine.
Corroded battery terminals also disrupt electricity flow. Loose battery connections can also interrupt power. A faulty drive belt can prevent the alternator from working. Sometimes, even a problem with the car’s computer system can cause the car battery light to illuminate.
Why Prompt Action is Crucial
You must act quickly when the car battery light comes on. Ignoring this battery warning light can lead to serious problems. A failing charging system creates safety hazards. Your headlights might dim or flicker.
This happens because of unstable voltage. Erratic electrical components are another risk. A bad voltage regulator cannot manage electricity flow. This causes unpredictable behavior in dashboard lights. Your power windows, radio, or air conditioning might work intermittently. This can be unsafe. A failing system can also cause your vehicle to stall while you drive. This is very dangerous, especially in heavy traffic or at high speeds. A dead battery can leave you stranded.
Long-term consequences also exist. A failing alternator can rapidly drain your battery. This leaves your vehicle without power. Driving with dim lights means poor visibility. This is dangerous. A struggling alternator can also cause other electrical accessories to malfunction. This includes power windows and infotainment systems. Worn-out parts in the alternator can lead to mechanical failure.
You might hear grinding or squealing noises. A bad voltage regulator can overcharge or undercharge the battery. Overcharging damages the battery and other components. Undercharging prevents the battery from fully powering your car. You need to address the issue promptly.
Safety First: Before Emergency Checks
Before you start any emergency checks on your car’s electrical system, you must prioritize safety. Taking a few moments to prepare can prevent accidents and ensure accurate results.
Secure Your Vehicle
Your safety comes first. Park your car on a flat, stable surface. Engage the parking brake firmly. Turn off the car’s engine completely. Remove the key from the ignition. This stops accidental starts. It also prevents any unexpected car movement.
Power Down Accessories
Turn off all electrical accessories. This includes your headlights, radio, and air conditioning. Turn off interior lights. These items use power. They can drain your car battery faster. This also lowers the electrical load. It makes your emergency checks safer.
Prepare Basic Tools
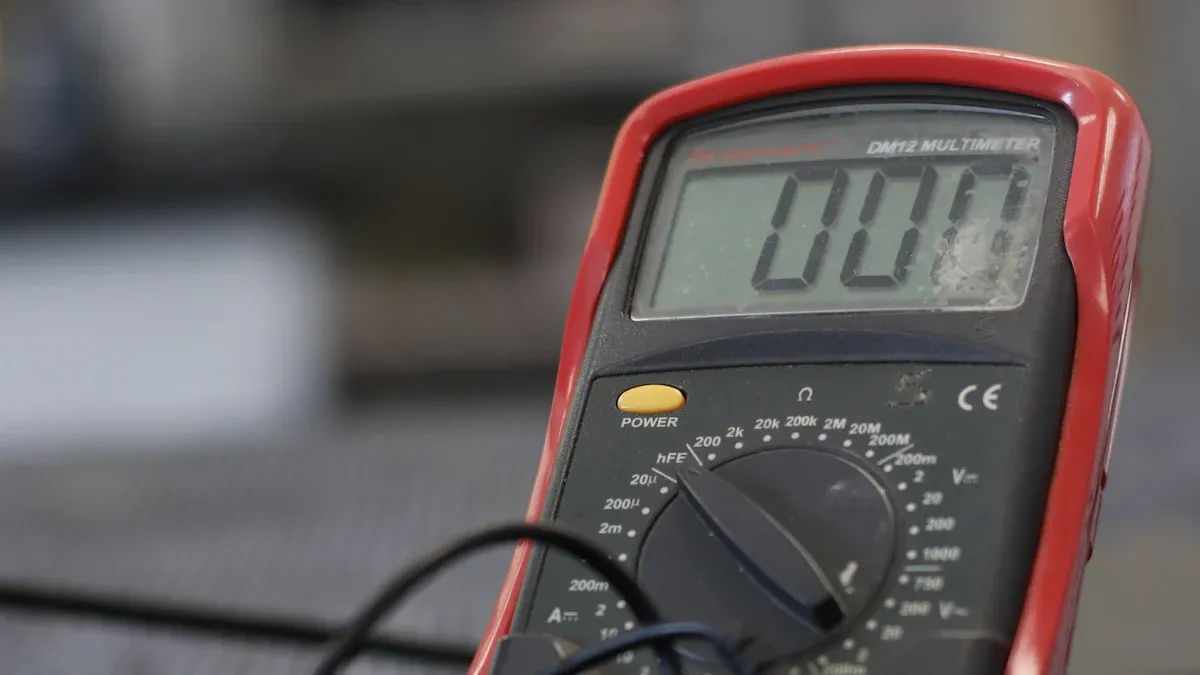
Gather necessary tools before you begin your check. You will need a multimeter for voltage tests. Have basic hand tools ready. These include wrenches and screwdrivers. Safety gear is very important. Wear electrical safety gloves.
These are your main defense against live electrical parts. For car electrical systems, rubber insulating gloves are essential. ASTM D120 class 00 gloves are proof tested for high voltages. Standard latex gloves do not protect against electrical shock. You can wear cotton undergloves beneath your electrical gloves.
These reduce sweating and add comfort. Put leather overgloves on top of the rubber insulating gloves. These protect against cuts and electrical arcing. A face shield protects your eyes. It guards against ‘flash over’ from electrical sparks. This offers forehead protection and a wide view. Consider dielectric overboots. You wear these over your shoes.
They provide extra insulation against electric shocks. An insulating rubber apron offers more protection for your body. This apron is often made from thick neoprene. Using insulating hand tools is also a good idea. These items keep you safe during your work on the car.
Initial Visual & Auditory Checks for Alternator Issues
Inspect Battery Terminals and Cables
You should first check your battery terminals and cables. These connections are vital for power flow. Look for any signs of corrosion. Corrosion often appears as a white or greenish powder.
You might also see flaky or crusty deposits around the terminal clamps. The metal itself could look dull, dark, or blackened. This discoloration indicates a problem. Excessive corrosion can prevent your battery from charging properly. Also, check for looseness. Wiggle the cables gently. They should feel secure. Finally, inspect for any physical damage to the cables. Frayed wires or cracked insulation need attention. This check helps you identify issues with your battery.
Examine Alternator Belt Condition
Next, examine the alternator belt. This belt drives your alternator. It also powers other accessories. Look for any cracks on the belt’s surface. Fraying along the edges is another bad sign. The belt should not feel too loose or too tight. A loose belt can slip. This prevents the alternator from working correctly.
A tight belt can strain bearings. You might hear a high-pitched squealing sound when you start your car or accelerate. This often means the belt is slipping. A shiny or slick appearance on the belt also shows wear. If the belt is failing, your headlights might dim. Your power windows could act up. The battery warning light might even come on. This indicates the alternator is not properly charging your car’s battery.
Listen for Unusual Alternator Noises
Now, listen carefully for unusual noises coming from your engine bay. A healthy alternator runs quietly. You should pay attention to specific sounds. A whining noise often indicates a problem. Grinding sounds are also a red flag.
These noises can point to a failing alternator bearing or pulley. Squealing sounds, as mentioned, often mean a slipping belt. However, they can also come from a struggling alternator. These sounds tell you the alternator is under stress.
Check for Burning Odors or Frayed Wires
Finally, use your senses of smell and sight. Sniff for any burning odors. A smell like burning rubber can mean a slipping belt. An electrical burning smell suggests something more serious. This could be overheating alternator coils.
Dust or corrosion can cause coils to overheat. Melting insulation or wiring near the alternator also creates this smell. Damaged wires can short-circuit and melt. You should visually inspect all visible wiring around the alternator. Look for any frayed wires or melted plastic. Oil or coolant dripping onto a hot alternator can also cause a burning smell. An excessive electrical load from aftermarket accessories can make the alternator work too hard. This causes it to overheat.
“Many drivers assume a burning smell means their alternator’s dead,” explains a veteran technician. “But often, it’s just a worn belt heating up — the trick is catching it early before it damages anything else.”
This check helps you identify potential fire hazards.
Basic Electrical System Diagnostics
Observe Headlight Brightness Fluctuations
You should observe your headlights. Turn them on.
Do they seem dimmer than usual? Do they flicker? Headlight brightness directly correlates with alternator output. If your alternator produces too much voltage (over 14.5 volts), your headlights will become excessively bright. If the output is too low, the lights will be dim. When the alternator’s output fluctuates, your headlights will flicker.
Dimming or flickering headlights are key indicators of alternator output issues. Diminishing brightness often signals a failing alternator and a compromised electrical system. If your headlights flicker, it could point to problems with the voltage regulator. These variations suggest a faltering power supply. A healthy alternator ensures steady headlight luminosity. Even the battery warning light itself is a crucial indicator.
Test Power Accessory Performance
Next, test your car’s power accessories. Turn on your radio, air conditioning, and power windows. Do they work slowly or not at all? A failing alternator or its voltage regulator can cause inconsistent voltage.
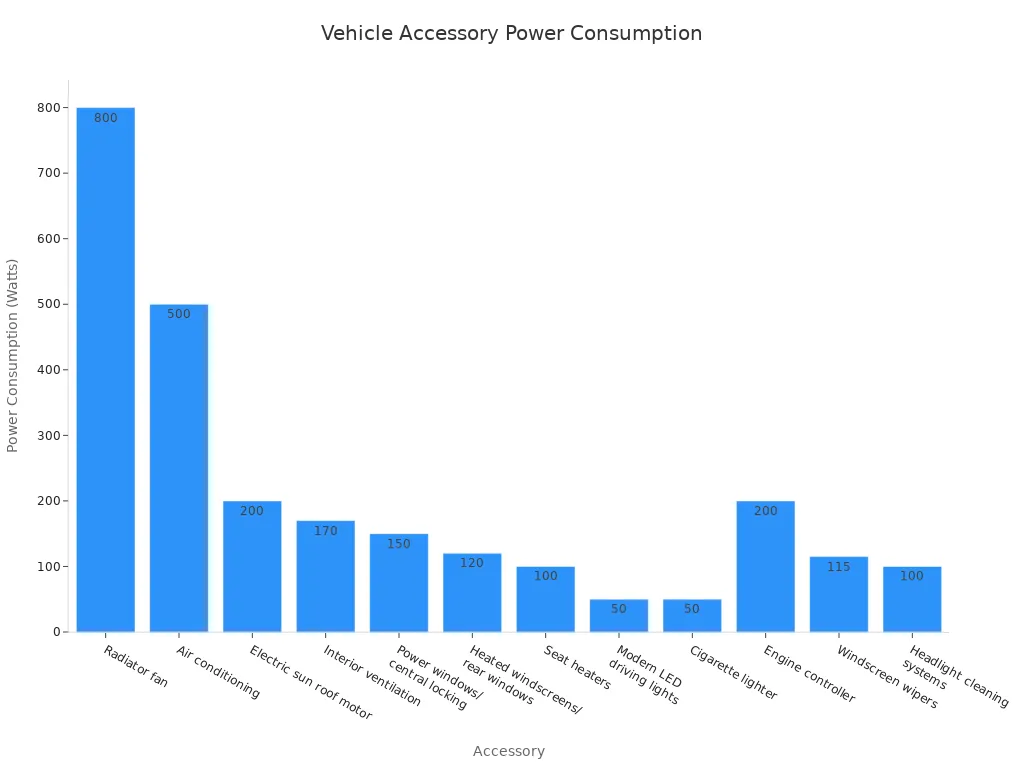
This leads to under- or over-performing equipment. For example, your power windows might take longer to operate. Your seat warmers might feel “off.” In modern cars, the system might shut down non-essential accessories first. This saves power when the alternator fails. The alternator powers all these components. When it malfunctions, they underperform due to insufficient power. Here is how much power some common accessories use:
Monitor Dashboard Gauge Behavior
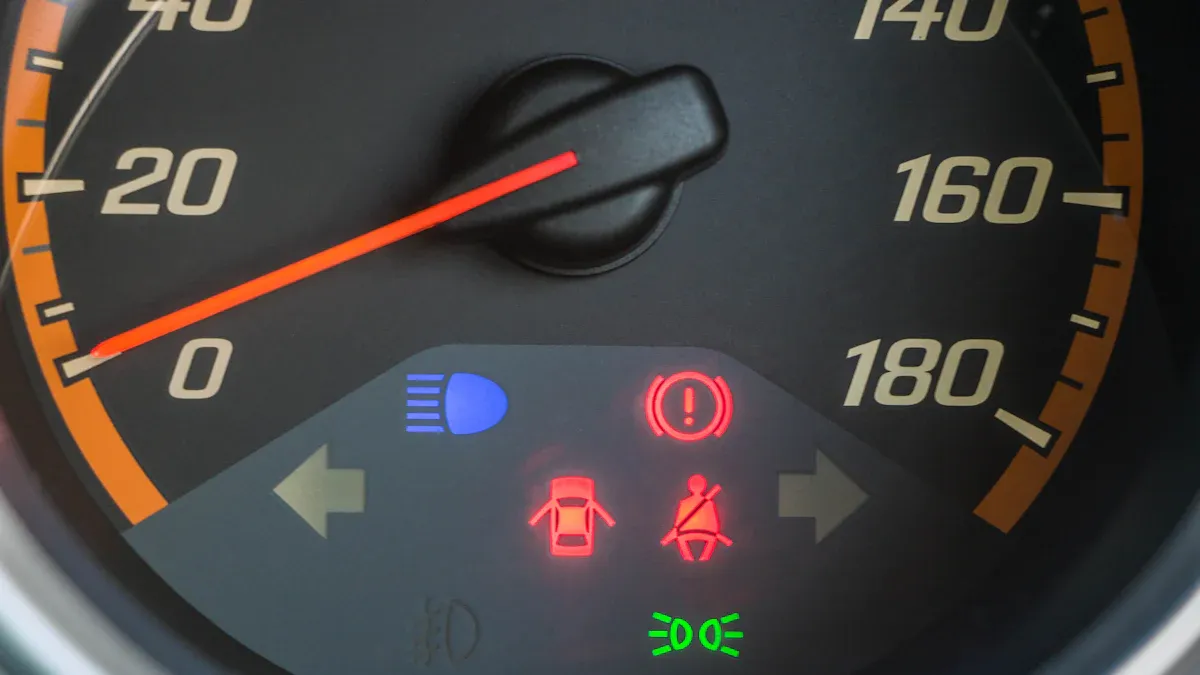
Finally, monitor your dashboard gauges. Look for any unusual behavior. Are your gauges acting erratically? Do they flicker? Flickering dashboard lights or dimming interior lights while driving can signal a charging system problem. You might also notice your car has trouble starting. This is another sign. If your car experiences frequent stalling, this also points to an issue. Multiple warning lights triggering simultaneously is a clear indicator. If you have trouble starting your car, it often means the battery is not getting enough charge.
Advanced Alternator Voltage Tests
Measure Battery Voltage (Engine Off)
You need a multimeter for this test. First, turn off your car’s engine completely. Connect the multimeter’s red lead to the positive battery terminal. Connect the black lead to the negative battery terminal. Read the voltage displayed on the multimeter. A fully charged 12-volt car battery should measure 12.6 volts. This measurement is its “resting voltage.” If your reading is below 12.4 volts, your battery is discharged. This initial battery check helps you understand the battery’s current state.
Measure Charging Voltage (Engine Running)
Now, start your car’s engine. Keep the multimeter connected to the battery terminals. Let the engine run at idle. Observe the voltage reading. The ideal charging voltage range for your car’s electrical system is approximately 13.7 to 14.7 volts. If your reading is below 13.5 volts or above 14.7 volts, this often points to a problem.
It could be a bad alternator or a faulty voltage regulator. A faulty voltage regulator shows oscillating voltages. It might go above 14V or drop below 12V. This means it is not regulating the electrical output correctly. If you install a new regulator, a working alternator should output between 13.5 and 15.5 volts. If readings are still outside this range, and the regulator is new, it suggests issues with the alternator’s internal parts. These include the stator, rotor windings, or diodes. A low reading means your battery is not getting enough charging power. This can lead to a dead battery.
Confirm Alternator Pulley Rotation
Next, visually check the alternator pulley. Ensure the engine is off before you get close. You want to see if the pulley spins freely and consistently. Look at the relationship between the alternator pulley and the crank pulley from underneath your car. If the belt appears to twist or bend as it travels, this shows a misalignment issue.
Look for uneven wear on the belt and pulleys. The belt should run centrally on the pulleys. Any sideward movement or slippage signals misalignment. You can use a straightedge or a taut string along the pulley faces. This helps you check for perfect alignment. Deviations suggest angular or parallel misalignment.
Inspect the pulley grooves for wear. Worn grooves can affect the belt’s position. This means you might need maintenance or replacement. A loose or seized alternator pulley can cause strange noises. You might hear a high-pitched whining or grinding sound. This is often louder during acceleration.
This can mean worn-out bearings inside the alternator. It can also mean a loose belt. If the alternator fails to recharge the battery, you will get a weak or dead battery. This leads to starting problems. A failing alternator might not give enough power to electrical parts. Your radio, air conditioning, or power windows might work erratically.
However, if all pulleys seize, or the serpentine belt breaks, the alternator simply stops turning. This does not damage the alternator itself. Once you apply a new belt or pulleys, the alternator will work again. It will produce current to charge your battery.
Interpreting Results & Next Steps for a Bad Alternator
Deciphering Your Check Findings
You have performed several checks. Now, you need to understand what your findings mean. If you noticed dim or flickering lights, especially at idle, your vehicle struggles to maintain consistent voltage. Malfunctioning electrical accessories, like slow power windows or erratic infotainment systems, also suggest the alternator cannot keep up with power demands. The battery-shaped warning light on your dashboard often signals a charging system issue, not just a battery problem.
If your battery is dead shortly after driving, this implies the alternator failed to recharge it. A burning rubber or electrical smell under the hood points to an overheating alternator or a slipping belt. Hard starting or frequent stalling means insufficient power delivery to critical engine components. These symptoms definitively point to an alternator failure.
When to Seek Professional Help
Your emergency checks provide valuable clues. However, sometimes you need professional help. Modern ‘smart’ charging systems are complex. The Engine Control Module (ECM) manages them. It controls factors like electrical loads and fuel economy. A simple voltmeter might not be enough. A scan tool is essential. It determines what your vehicle commands the alternator to output.
Then, it compares this desired level with the actual output. Issues like excessive parasitic drains also require expert attention. Vehicle communication networks can influence alternator output. Mechanical problems with alternator pulleys, such as overrunning or isolator decoupler designs, also need professional diagnosis. Even basic issues like blown fuses, especially hidden ones, require professional diagnostic strategies. These often involve voltage drop tests and schematic analysis. For these complex situations, you need professional alternator service. Do not delay.
You now understand the importance of these 12 emergency checks. They help you quickly identify potential alternator problems when your dashboard battery light comes on. These emergency checks are diagnostic steps. They are not a permanent fix for a bad alternator. You need professional inspection and repair for any suspected charging system issue. This protects your car’s battery. Prioritize your safety and your car’s longevity. Act promptly and responsibly when the car battery light illuminates. The battery warning light signals a serious issue.
FAQ
What does the alternator do?
Your alternator recharges the car battery. It also powers your car’s electrical systems while the engine runs. It converts mechanical energy into electrical energy. This keeps everything working.
Can I drive my car if the battery light is on?
You can drive for a short time. Your car runs on battery power. The battery will drain quickly. You risk a breakdown. Seek help immediately to avoid getting stranded.
How long does an alternator typically last?
Alternators usually last about 5 to 8 years. This depends on your driving habits. It also depends on your car’s electrical demands. Regular maintenance helps extend its life.
What makes an alternator fail?
Several things cause failure. Worn bearings are common. A bad voltage regulator can cause issues. Overuse or electrical shorts also lead to failure. A loose or broken belt stops it from working.


