Should your 2017 Silverado feels bouncy, pulls to one side, or shows uneven tire wear, you’ll want to replace the struts to regain safe, smooth handling. You can choose OE or quality aftermarket struts, gather a jack, stands, spring compressor, torque wrench, and safety gear, then follow stepwise removal and install with proper torque and a post-install alignment. Drive gently for break-in and recheck hardware and ride feel at 100 and 500 miles to catch issues promptly, and you’ll learn what to watch for next.
What Struts Do on a 2017 Chevrolet Silverado
Curious how those struts actually help your 2017 Chevrolet Silverado feel steady and safe on the road? You rely on struts for shock absorption and to keep your tires planted whenever you drive with friends or family.
They control bounce over bumps, so you notice less jolt and more ride comfort. As you steer, struts help maintain alignment, so the truck tracks true and you feel confident in traffic.
They also support the vehicle weight, working with springs to keep the cab level during loading up gear. Together these roles create a smoother, more secure ride that connects you to the road and to others sharing the trip. That shared sense of safety matters and makes every drive easier and more enjoyable.
Signs Your Silverado’s Struts Are Worn
Have you noticed your Silverado feels loose or bouncy lately? You’re not alone, and it’s crucial to trust those feelings. Worn struts make driving less confident. You might hear a noisy suspension clunk over bumps. You could also see uneven tirewear, pull to one side, or feel heavy body roll in turns. Below is a quick guide to common signs and what they mean.
| Symptom | What you feel | What to expect |
|---|---|---|
| Bouncy ride | Car rebounds after bumps | Struts might not dampen motion |
| Noisy suspension | Clunks or rattles | Mounts or strut internals worn |
| Uneven tirewear | Bald spots or feathering | Alignment changes from bad struts |
| Pulling | Steering drifts | Uneven damping sides |
| Nose dive | Harsh braking forward | Worn front struts |
Tools and Safety Gear Needed for Strut Replacement
Which tools and safety gear do you really need before you start replacing struts on your Silverado? You’ll want a strong jack, sturdy jack stands, and wheel chocks so the truck stays put.
Add a torque wrench, breaker bar, sockets, and a spring compressor for safe disassembly. Impact wrenches speed the job, yet have hand tools ready in case.
Protective eyewear is essential to shield you from debris and compressed springs. Wear gloves, closed shoes, and a dust mask when needed.
Keep a clean workspace lighted well and a fire extinguisher nearby. Invite a friend to help for safety and moral support. That shared care helps you stay calm and focused while you work step by step on your Chevy.
Choosing the Right Replacement Struts and Parts
Whenever you’re picking replacement struts, consider OE versus aftermarket choices so you know whether you want factory fit or a cost-saving upgrade.
Check that the spring and mount match your Chevy’s specs because the wrong parts will change ride height and safety.
Also make sure the strut valving matches your driving style so the car handles smoothly and you remain confident on the road.
OE Vs Aftermarket Options
Curious about whether you should stick with original equipment struts or try aftermarket options for your Chevy? You want reliable parts and a sense of belonging with others who care for their Silverado. Start with a cost comparison and warranty differences so you feel confident.
OE parts match factory fit and ride. Aftermarket parts can save money and offer variety, but they vary among brand.
- OE offers exact fit and consistent feel for your truck
- Some aftermarket brands give better value and modern features
- Check warranty differences to see who stands behind the part
- Join local owner groups to hear real experiences and recommendations
Trust your judgment. Ask questions, compare specifics, and pick what feels right for your truck and community.
Correct Spring and Mount
Since you’ve weighed OE and aftermarket options, the next step is picking the right spring and mount for your Chevy’s replacement struts. You want parts that match your driving style and keep your crew comfortable.
Choose springs with correct rate and length so ride height stays even and spring noise stays away. Inspect mounts for mount corrosion and choose replacements with durable coatings and proper rubber hardness. That reduces creaks and keeps steering aligned.
Ask your community or mechanic about trusted brands and compare warranties. At the time you buy, confirm included hardware and bearing condition so installation is smooth.
These choices protect your investment and help you feel confident on the road with friends or family riding along.
Matching Strut Valving
Want your Chevy to ride like it did the day you drove it off the lot? You’re part of a group that cares about a confident, comfy drive. Matching strut valving matters because valving impact changes how your Silverado soaks up bumps and holds corners.
Pick struts that match original damping characteristics or tweak them to suit your needs.
- Choose OEM or tuned aftermarket units that match factory damping characteristics
- Consider heavier valving for towing or lighter valving for daily comfort
- Ask a trusted tech to compare valving impact between brands and test drive options
- Replace mounts and springs together so damping characteristics stay balanced
These steps help you keep a shared sense of satisfaction and trust in the ride you own.
Step-by-Step DIY Strut Replacement Procedure
Now that you’ve picked the right parts, it’s time to get hands-on with safety and preparation so you feel calm and ready.
You’ll initially remove the old strut with clear steps and proper tools, then shift smoothly into installing the new strut while checking alignments and fasteners.
I’ll walk you through each part at a steady pace, so you stay safe, confident, and in control throughout the job.
Safety and Preparation
Before you lift the car, take a deep breath and gather everything you need so the job feels calm and controlled. You’re joining a small group of makers who care for their truck, and that feeling matters.
Begin with a pre workshop checklist and confirm emergency preparedness. Lay out tools, jack stands, wheel chocks, gloves, and safety glasses. Check the parking brake and work on level ground. Tell a friend your plan and keep your phone nearby.
- Good lighting and clean workspace
- Proper jack and rated jack stands
- Wheel chocks and gloves for hand safety
- Initial aid kit and charged phone for backup
These steps connect safety with readiness, so you move confidently into the repair.
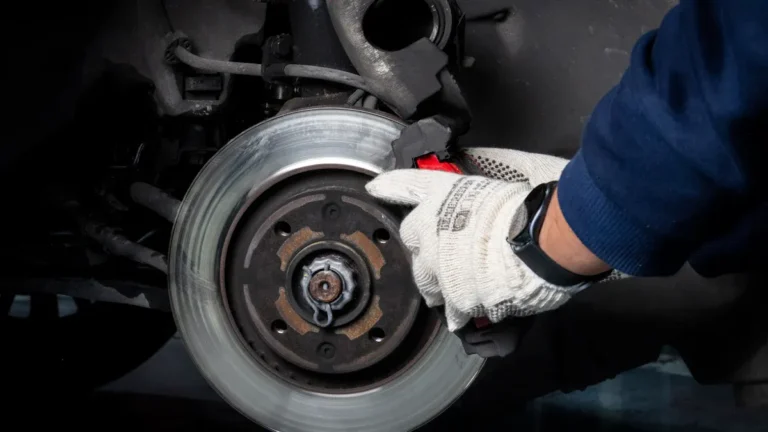
Removing Old Strut
Take a deep breath and roll up your sleeves; removing the old strut is a careful, stepwise task that you’re able to handle with patience and focus. Start by supporting the truck securely and relieving suspension load so the wheel can hang free.
Loosen lug nuts and remove the wheel, then back off any rusted fasteners with penetrating oil to aid bolt loosening. Work as a small team should you be able because another set of hands comforts and steadies you. Detach brake lines and sway bar link from the strut, keeping parts labeled and close.
Undo the top mount nuts in the engine bay while you hold the strut below. Lower the assembly gently, watching for springs or hardware that could shift. Use rust prevention measures on surrounding metal before moving on.
Installing New Strut
As soon as you’re ready to put the new strut in, work slowly and with steady hands so nothing gets rushed or bent; you’ve already done the hard part removing the old unit, and this initial phase is about careful fitment and safe tightening.
Slide the strut up into the mount, line the studs, and hand-thread the nuts so everything stays aligned. Check bushing lubrication now to prevent squeaks and wear.
Tighten top studs to spec, then set the lower bolts while keeping the hub centered. After torqueing, perform a gentle strut adjustment by turning the assembly until the wheel sits true.
- Hand-thread top nuts ahead of all else to keep alignment
- Apply bushing lubrication to each contact point
- Torque fasteners in manufacturer sequence
- Verify wheel alignment before test drive
Torque Specs and Alignment Considerations
At the time you tighten the strut mounting bolts and nuts to the right torque, you’re keeping your Chevy safe and riding the way it should, and you’ll feel more confident on every drive. Use the service manual values and aim for proper torque on top mounts, lower bolts, and sway bar links. You and your crew will appreciate doing it right.
After torquing, consider alignment adjustments. New struts can change camber and toe, so check alignment specs. You can make small toe tweaks provided you have the tools, but a full alignment machine gives best results.
Tightening correctly and checking alignment work together to prevent uneven tire wear and keep steering true. You’ll leave the job aware your truck belongs on the road.
When to Hire a Professional for Strut Service
- You lack specialty tools like spring compressors or alignment gear and prefer safe hands
- You notice unusual noises or uneven tire wear that feel beyond DIY
- You want a written cost estimate and timeline from a shop you trust
- You value warranty coverage and ongoing support from a local mechanic
Aftercare: Break-In, Maintenance, and Troubleshooting
Once you’ve finished the strut job, give the new parts a gentle break-in so they settle properly and you feel confident on the road. Drive slowly for a few miles, then do a short road test at normal speeds. You and your truck will bond during this stage.
Check fluid levels and inspect for leaks, loose bolts, or odd noises. Schedule follow up checks at 100 and 500 miles to tighten hardware and recheck alignment feel.
In case you notice pulling, clunks, or sag, park safely and compare both sides visually. Troubleshoot step by step: verify torque, compare ride height, swap components in case of need, and consult parts diagrams.
Stay patient, ask for help from other owners, and keep records so you feel supported.