
Is your car window tint looking faded, bubbling, or perhaps too dark? You might need to remove tint. Removing window tint seems like a big job, but it is a manageable DIY project. You save money and gain satisfaction by doing it yourself. This guide will help you successfully remove your old window tint. You will learn the best methods for effective window tint removal. This comprehensive guide will show you how to tackle any stubborn window tint.
Key Takeaways
Gather the right tools like a heat gun, razor blade, and adhesive remover. Wear safety gear such as gloves and eye protection.
Prepare your windows by cleaning them and protecting your car’s interior before starting the tint removal.
Use heat from a heat gun or steamer to soften the tint’s glue. Peel the tint slowly and work in small sections.
Remove any sticky glue left on the window. Use plastic blades and cleaners like Goo Gone or rubbing alcohol.
Inspect your windows after removal. Consider professional help for complex windows or very stubborn tint.
Tools and Materials
Successful window tint removal starts with the right tools. Gathering everything beforehand saves you time. You will work more efficiently.
Essential Supplies
You need several key items for effective window tint removal. First, get a heat source. A heat gun or a steamer works best. A Master Appliance Heat Gun is a reliable choice for this task. It helps soften the old window tint. You also need a sharp razor blade. Use it carefully to lift edges. Prepare a spray bottle with soapy water. This helps lubricate the glass. Ammonia is another useful chemical. It helps break down old adhesive. You will also need an effective adhesive remover. Many tint shops trust ATR Adhesive Remover. It quickly melts film adhesive without harsh odors. This makes the removal process much easier. Finally, have some trash bags ready. They help contain the mess.
Safety Gear
Protect yourself during the window tint removal process. Always wear safety gear. Gloves are essential. Chemical-resistant gloves protect your hands. They prevent irritation or burns from chemical removers. You also need eye protection. Wear safety glasses with side protection. They shield your eyes from debris or chemical splashes. This is important when you work with chemicals or heat. Safety gear keeps you safe. It allows you to focus on the window tint.
Tint Removal Methods
You have your tools ready. Now, you can start the actual window tint removal. Different methods work for different situations. Choose the one that best fits your needs.
Window Preparation
Before you begin any method, prepare your windows. This step makes the job easier. First, clean the window thoroughly. Use glass cleaner and a microfiber cloth. Remove any dirt or grime. This gives you a clear view of the window tint. It also helps tools glide smoothly. Next, protect your car’s interior. Cover door panels and seats with towels or plastic sheets. This prevents water or chemicals from causing damage.
Heat Gun Technique
A heat gun is a powerful tool for removing window tint. It softens the adhesive. This allows you to peel the film off.
Start a Corner: Find a corner of the window tint. Use your razor blade to carefully lift a small edge. Be gentle. You only need enough to grab.
Apply Heat: Hold the heat gun a few inches from the window. Move it in circular motions. Apply heat to the outside of the window. You want the window to feel warm to the touch. Be conservative with the heat gun’s temperature dial. Avoid excessive heat. Too much heat can melt the window tint to the glass. This makes removal much harder.
Peel Slowly: As the adhesive softens, slowly pull the window tint away from the glass. Pull at a low angle. This helps the adhesive come off with the film. If the tint tears, stop. Reapply heat to that area. Then, find a new edge and continue peeling.
Work in Sections: Do not try to remove the entire window tint at once. Work in small sections. Heat a section, peel it, then move to the next. This method ensures a cleaner removal.
Steamer Technique
A steamer uses hot steam to loosen the adhesive. This is a gentler option than a heat gun. It can be very effective for removing window tint.
Prepare the Steamer: Fill your steamer with water. Let it heat up. The Jiffy Pro-Line SteamBlade (Model: J-4000SB) is a recommended tool. This specific model works well for both window tint and vinyl wrap removal.
Apply Steam: Hold the steamer nozzle close to the window tint. Move it slowly over a small section. The steam will penetrate the film. It softens the glue underneath.
Lift and Peel: As the adhesive softens, use your razor blade to lift an edge. Slowly peel the window tint away. Keep applying steam to the area you are peeling. This keeps the adhesive warm and pliable.
Continue Systematically: Work across the window. Steam a section, peel it, then move on. This systematic approach helps you remove tint efficiently.
Ammonia and Sunlight Method
This method uses household ammonia and the sun’s heat. It is a popular choice for removing window tint. The ammonia helps dissolve the adhesive.
Protect Your Car: Cover your car’s interior thoroughly. Ammonia fumes can be strong. They can also damage interior surfaces.
Prepare Ammonia Solution: Mix equal parts household ammonia and water in a spray bottle.
Safety First: Ammonia fumes require careful application. Work in a well-ventilated area. A garage with open doors or a shaded outdoor space is ideal. This avoids exposure to fumes. Wear protective gloves and safety glasses for personal safety. You can also wear a mask to avoid inhaling harmful fumes.
Spray the Tint: Spray the outside of the window tint generously with the ammonia solution.
Cover with Trash Bags: Cut a black trash bag to fit the window. Tape it securely over the sprayed window tint on the outside of the car. This traps the heat and ammonia.
Sun Exposure: Park your car in direct sunlight. The sun’s heat activates the ammonia. It softens the adhesive. Leave the plastic bag on the window for about 30 minutes. For the ammonia and plastic wrap technique, leave the plastic wrap in direct sunlight for 30-60 minutes.
Peel the Tint: After the sun exposure, the window tint should be soft. Go to the inside of the car. Carefully lift a corner of the tint with your razor blade. Slowly peel the entire film off. The adhesive should come off with the tint.
Removing Adhesive Residue
You successfully removed the old window tint. Now, you will likely see adhesive residue. You need to clean it off. This sticky film can be stubborn. Removing it completely ensures a clear, clean window.
Adhesive Removal Best Practices
You want to remove adhesive residue without scratching your car windows. Follow these best practices. First, clean the window with a mild glass cleaner. Use a microfiber cloth. This removes surface dust and grime. It also helps you see the residue clearly.
For stubborn, hardened glue, you can apply heat. Use a hairdryer or a heat gun on low heat. Hold it a few inches away. Move it in circular motions for 30 to 60 seconds. This softens the adhesive.
Next, scrape off excess glue. Use a plastic razor blade or a soft scraper. Work at a low angle. This prevents scratching the glass. Start from the edge. Push under the residue. Wipe your blade often. Never use metal blades on car windows. They can scratch glass. They can also damage tinted surfaces or defrost lines.
For any remaining sticky film, use an adhesive remover or alcohol. Soak a microfiber cloth with rubbing alcohol (70% or higher). You can also use a commercial adhesive remover like Goo Gone. Apply it to the glue area. Let it sit for 2 to 3 minutes. Then, rub in a circular motion. This breaks down the residue. Repeat this process if needed. Use fresh solution and clean cloths.
Recommended Cleaners
You have several options for cleaning adhesive residue.
Commercial Products:
Goo Gone: This product softens sticker residue. It makes wiping easy.
WD-40: It breaks down adhesive bonds.
Rubbing Alcohol: It dissolves adhesive residue. It also cleans the surface.
Home Solutions:
Cooking Oil: Vegetable, olive, or coconut oil can break down oil-soluble adhesive. Apply it. Let it soak. Then, gently scrape.
White Vinegar: Its acidity helps break down adhesive on glass. Soak a cloth in vinegar. Place it over the adhesive for 5 to 10 minutes. Then, rub until the residue lifts.
Baking Soda Paste: Mix baking soda with water. Form a paste. Gently rub it on the adhesive. This breaks it up without scratching.
Dish Soap: Mix two drops of dish soap per two cups of warm water. Apply the solution. Scrub gently. This works well for lighter residue.
Peanut Butter: The oils in peanut butter can dissolve sticker residue. Spread a small amount. Let it sit for 5 to 10 minutes. Then, wipe it off. Wash with soap and water.
Remember to avoid certain products. Do not use acetone or nail polish remover. They can damage rubber seals and plastic trim. Also, avoid paper towels. They can leave lint and scratch sensitive glass.
Final Cleaning Steps
After removing the glue, you need to clean off any oily film or chemical residue. Mix warm water with a few drops of dish soap in a spray bottle. Spray the window. Wipe it with a microfiber towel. Rinse with clean water. Dry it with a fresh cloth. This gives you a streak-free finish. This final cleaning step completes your window tint removal. You will have a perfectly clear window.
Finishing Up and When to Call Pros
You have removed the old window tint and cleaned the glass. Now, you need to ensure your work is complete and decide if you need professional help for any remaining issues.
Post-Removal Inspection
After you finish the main removal, inspect your windows closely. Look for any remaining adhesive or film fragments. Sometimes, even after thorough cleaning, you might find residual adhesive.
White, streaky marks that are not sticky.
Stains from the adhesive rather than the adhesive itself.
Marks that typical adhesive removers do not remove.
Even with quality film, the adhesive often remains on the glass after the film is peeled off. You must remove all of it for a clear finish.
Professional Removal Considerations
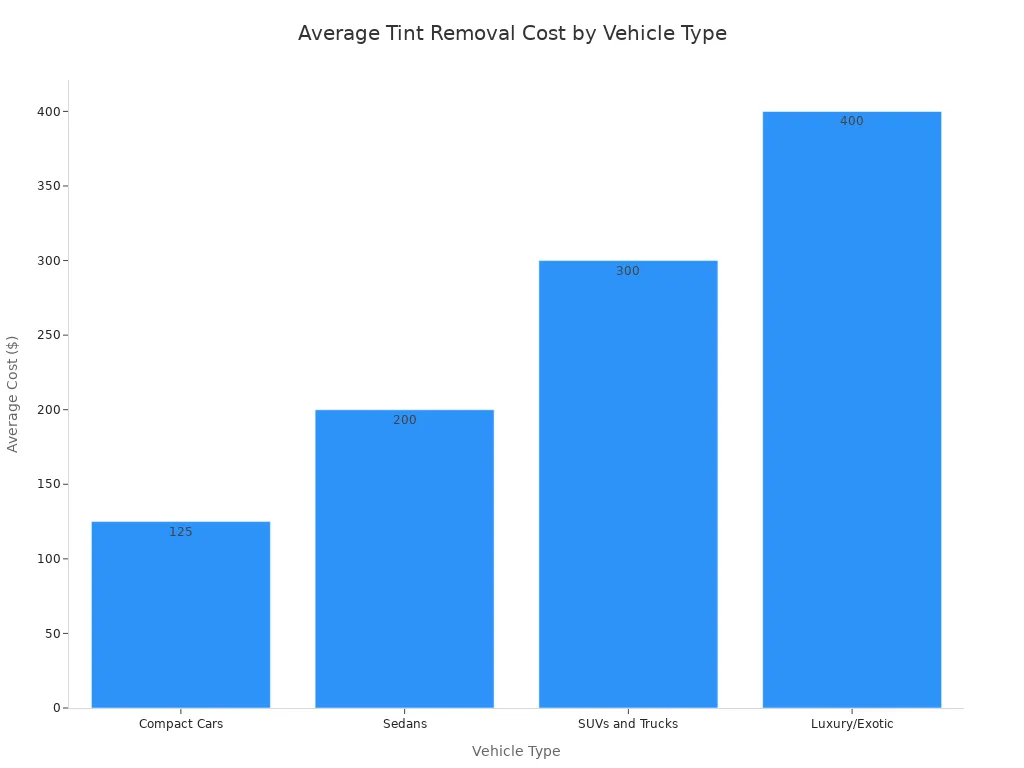
DIY window tint removal saves money. However, some situations make professional help a better choice.
Vehicle Type | Average Cost Range |
|---|---|
Compact Cars | $100 – $150 |
Sedans | $150 – $250 |
SUVs and Trucks | $200 – $400 |
Luxury/Exotic | $300 – $500+ |
Consider professional window tint removal if:
Complex Windows: Rear windows have defroster lines. These require expert handling to avoid damage during removal.
Unusual Adhesives: Some tints use industrial-strength adhesives. These may not respond to standard removal methods.
Time Constraints: Professionals complete the job more quickly. They use specialized tools and techniques.
Stubborn Residue: You encounter adhesive residue that you cannot remove.
Film Tearing: Old or poorly applied window tint can tear. This makes the process longer. It also increases the risk of leaving adhesive or scratching the glass.
Professionals use specialized tools. They ensure no adhesive residue remains. This provides a clean surface.
DIY Success Tips
You can successfully remove your car’s window tint. Be patient and take your time. Work in a well-ventilated area. Always wear safety gear. Do not rush the process. This prevents damage to your windows. You will achieve a clean, clear result.
Removing window tint is a rewarding DIY project. It significantly improves your vehicle’s appearance. You learned key steps: preparation, heating, peeling, and cleaning. Take your time. Be patient during the process. You can successfully remove tint. This project builds your confidence. You can tackle future DIY car projects. Your car’s window tint will look great.
FAQ
Can I remove window tint in cold weather?
You can remove window tint in cold weather. However, the adhesive becomes brittle. This makes peeling harder. You should warm the glass first. Use a heat gun or park your car in a heated garage. This softens the glue.
How long does it take to remove car window tint?
The time varies. It depends on the window size and tint condition. A single window might take 30 minutes to an hour. A full car can take several hours. Old, brittle tint takes more time. Be patient.
What if I accidentally scratch my car window?
You can scratch your car window if you use metal blades. Always use plastic razor blades. If you see a scratch, you cannot easily fix it. You might need professional glass repair. Be careful when you scrape.
Can I re-tint my windows immediately after removal?
Yes, you can re-tint your windows immediately. First, ensure you remove all adhesive residue. The glass must be perfectly clean. Any leftover glue will prevent new tint from sticking properly. A clean surface is crucial. ✨
Is it safe to use ammonia inside my car?
You can use ammonia inside your car. However, you must protect your interior. Cover seats and door panels. Ammonia fumes are strong. Ensure good ventilation. Open all doors and windows. Wear a mask for safety. 😷


