I know accurate bike frame measurement is crucial for optimal bike fit, comfort, and performance. A well-fitted bike also helps prevent injuries. Manufacturers often use inconsistent sizing charts for their bike frame models. This makes understanding your individual frame dimensions essential when you measure bike frame for personalized bike selection and setup. This guide will demystify complex bike geometry, making the process clear. You will understand bike geometry.
Why Measure Your Bike Frame
Rider Comfort And Fit
I believe comfort is paramount when you ride a bike. A properly measured bike frame ensures your body aligns correctly with the bike. This means your arms, legs, and torso are in their natural positions. When your bike fits you well, it feels like an extension of your body. You avoid awkward stretches or cramped postures. This makes every ride more enjoyable, whether it’s a short commute or a long-distance adventure.
Performance And Efficiency
A well-fitted bike directly impacts your performance. When your bike frame matches your body, you can transfer power more efficiently to the pedals. This means less wasted energy and more speed for the same effort. I find that a correctly sized bike allows me to maintain a strong, consistent pedal stroke. This leads to better endurance and overall efficiency on the road or trail.
Injury Prevention
Incorrect bike sizing can lead to significant discomfort and even serious injuries over time. I have seen many riders suffer because their bike did not fit them. For example, poor bike fit often causes:
Neck pain: This comes from incorrect posture and staying in the wrong position for too long.
Lower back pain: Hunching over handlebars for extended periods often causes this.
Knee pain: Your seat height directly impacts this. A seat that is too low stresses your kneecap.
Wrist pain: Gripping handlebars and leaning forward excessively can compress nerves, leading to issues like carpal tunnel syndrome.
Foot numbness: Ill-fitting footwear, which becomes too tight as feet swell during cycling, is the main cause. Measuring your bike frame accurately helps prevent these common cycling ailments.
Sizing Inconsistencies
You might think you can just trust the manufacturer’s stated frame size. However, I have learned that manufacturers often use different methods to measure their bikes. A “medium” from one brand might be completely different from a “medium” from another. This inconsistency means you cannot rely solely on generic sizing charts. You need to measure bike frame dimensions yourself. This ensures you get a bike that truly fits your unique body proportions, regardless of what the label says.
Essential Tools For Accurate Measurement
Measuring Tape Or Ruler
I always start with a good quality measuring tape or a sturdy ruler. These are your most basic tools for linear measurements. You will use them for critical lengths like the seat tube, top tube, and chainstay. I find a metal tape measure offers the best rigidity and accuracy. Make sure your tape is long enough for the entire bike.
Spirit Level Or Angle Finder
A spirit level or an angle finder is absolutely essential for precise work. I use it to ensure my bike is perfectly level before I take any measurements. An angle finder helps me determine the head tube and seat tube angles with great precision. This tool removes all guesswork from angular measurements, giving you reliable data.
Plumb Bob
A plumb bob is a simple but incredibly powerful tool. It is just a small weight attached to a string. I use it to establish true vertical lines. This is critical for accurately measuring dimensions like reach and stack. It helps me project points straight down to the floor, ensuring my vertical references are exact.
Recording Tools
You absolutely need a reliable way to record your findings. I always keep a dedicated notebook and a pen right next to me. A digital device like a tablet or phone also works well for this. You will write down every single measurement immediately after you take it. This prevents any potential errors and helps you track your progress systematically.
Stable Setup
A stable setup is non-negotiable for accurate measurements. I always place my bike on a sturdy work stand. If you do not have a stand, a flat, level surface works, but you must ensure the bike remains upright and steady. The bike must not wobble at all. Any movement can significantly throw off your measurements. This ensures consistent and reliable results when you measure bike frame.
Preparing Your Bike For Measurement
Before I can accurately measure bike frame dimensions, I must properly prepare the bike. This preparation ensures I get precise and consistent results. It also makes the entire process much easier.
Component Removal
I always begin by removing certain components from the bike. First, I take off both wheels. This makes the bike lighter and much easier to handle. It also gives me clear access to areas like the dropouts and bottom bracket. Next, I remove the pedals. They can obstruct measurements, especially around the bottom bracket shell. I also take out the seatpost and saddle. This allows me to measure the seat tube length without any interference. Sometimes, I even remove the handlebars and stem if they get in the way of head tube measurements. This step ensures nothing blocks my view or my measuring tools.
Leveling The Bike
After removing components, I level the bike. This is a crucial step for accurate measurements. I place the bike on a sturdy work stand. Then, I use a spirit level to ensure the top tube is perfectly horizontal. If the bike has a sloping top tube, I level the main frame triangle as best as possible. I might place the spirit level on the head tube or seat tube to check for vertical alignment too. A level bike provides a consistent reference point for all subsequent measurements. This prevents errors caused by a tilted frame.
Securing The Frame
Finally, I secure the bike frame. A stable frame is essential for precise measurements. I tighten the clamps on my work stand firmly, but not so tight that I damage the frame. I want the bike to be completely still. It should not wobble or shift while I am taking measurements. Sometimes, I use straps to further stabilize the frame, especially if it is a lightweight carbon bike. This ensures the bike remains in its leveled position throughout the entire measurement process. A secure setup means I can focus on my measurements without worrying about the bike moving.
Key Bike Frame Measurements
This section defines each measurement. I will explain its impact on ride quality. I will also provide precise, step-by-step instructions on how to measure it. These are the key measurements for any bike frame.
Seat Tube Length Measurement
The seat tube length is a critical measurement. It dictates the frame size. It also determines the potential saddle height. An improperly sized seat tube can cause discomfort and pain. It can also reduce control. This ultimately hinders performance. It can even cause injuries. Selecting a bike with the correct seat tube length is essential for optimal rider comfort and enjoyment.
I measure seat tube length in two main ways.
Traditional “C-T” (Center-to-Top) Method: I measure from the center of the bottom bracket shell to the top of the seat tube. If the seat tube extends above the top tube, I include that protruding part in my measurement. I always start from the dead-center of the crank bolt for consistency.
Common US Method: I measure from the center of the bottom bracket shell to the top of the seat tube. This method is similar to C-T. I still ensure I start from the dead-center of the crank bolt.
Top Tube Length Measurement
The top tube length affects how stretched out I feel on the bike. I differentiate between two types:
Actual Top Tube Length: I measure this directly along the physical top tube from the center of the head tube to the center of the seat tube.
Effective Top Tube Length (ETT): This is a more important measurement for fit. I imagine a horizontal line from the top of the head tube to the seat tube. I measure the length of this imaginary line. I measure to the intersection of this horizontal line and the seat tube.
There are conflicting views on the relationship between actual and effective top tube lengths. One perspective states that the effective top tube can never be longer than the actual center-to-center measurement. For a horizontal top tube, these lengths are identical. As the slope increases, the effective top tube becomes shorter relative to the actual. This is supported by the formula ET = TT * cos(theta). Here, ET is effective top tube, TT is actual top tube, and theta is the top tube’s angle. Since cos(theta) is always less than or equal to 1, ET is always less than or equal to TT. This view also likens the actual top tube to the hypotenuse of a right triangle. The hypotenuse is always longer than its sides. One of these sides would be the effective top tube.
Conversely, other sources suggest that the effective top tube is always longer than the actual top tube. Or it is at least equal to or longer, especially with increased slope. One argument posits that the effective top tube is the hypotenuse in a right triangle. This makes it always longer than the actual top tube. Another statement indicates that the effective top tube length is generally greater than or equal to the actual length. Additionally, the seat tube angle is a factor influencing effective top tube length and rider fit. A change in seat tube angle can effectively alter the top tube length required for the same reach.
Head Tube Length Measurement
I measure the head tube length from the very top edge to the very bottom edge of the head tube. I do not include any headset cups. This measurement tells me about the front end height of the bike. A longer head tube generally means a more upright riding position. A shorter one allows for a more aggressive, lower position.
Reach Measurement
Reach is a crucial measurement for understanding how a bike will fit. It helps me interpret the frame’s size. It also tells me how stretched out I will feel. Bikes with shorter reach generally feel more compact. Those with increased reach feel longer. They are often suited for performance-oriented cycling.
I define reach as the horizontal measurement. I measure from the center of the bottom bracket to the center of the top of the head tube. Reach measures the horizontal distance between the center of the bottom bracket and the top of the head tube. Combined with stem length and handlebar reach, this number indicates the length of my bike’s cockpit. A higher reach number means a more stretched-out riding position. Comparing reach numbers helps me understand what length stem and handlebar reach I need for a new bike. This aids in consistent fit across different models and brands. More reach contributes to a more aggressive bike setup. It makes the front end feel longer. Less reach contributes to a more conservative or relaxed bike setup. It makes it feel shorter. I use a plumb bob to project the center of the head tube down to the floor. Then I measure horizontally from the bottom bracket center to that point. This gives me an accurate reach measurement.
Stack Measurement
Stack is the vertical counterpart to reach. It tells me about the height of the front end. Frame stack is the vertical distance. I measure from the bottom bracket’s center to the head tube’s top center. It establishes the fundamental height for the bike’s front end. It significantly influences handlebar height. Consequently, it affects whether my position is upright or aggressive. Grip stack offers a more precise measurement of my hand position vertically from the bottom bracket. It incorporates the frame stack. It also includes additional height from headset spacers, the stem, handlebars, and hood positioning. This makes it the most accurate way to gauge hand height.
Handlebars that are too high can make climbing difficult. They prevent me from leaning forward enough to keep the front wheel grounded. It also hinders wheelies and manuals. This often leads to a ‘hanging off the handlebars’ posture. My weight shifts too far back during descents. This elevated position can result in an upright, slightly rearward, and defensive posture. It reduces stability and my ability to react to trail conditions. My primary objective for handlebar height is to achieve an athletic, centered, neutral, and hinged body position. This is for both standing and descending. It should not compromise climbing posture. Even minor adjustments, such as 10mm, can profoundly impact body position, confidence, and control. I use a spirit level and a plumb bob to get an accurate stack measurement. I measure vertically from the bottom bracket center to the top of the head tube.
Reach and stack are two of the most important key measurements for bike fit.
Chainstay Length Measurement
I measure the chainstay length from the center of the bottom bracket to the center of the rear axle. I measure along the chainstay. This measurement impacts how the bike handles.
Bikes with shorter and stiffer chainstays tend to feel more responsive. This is especially true when sprinting at higher cadences. They are also more suitable for standing to pedal during climbs. Conversely, longer chainstays generally favor seated climbing. They offer better traction. But they can make standing and torquing more challenging. This is due to potential loss of traction. The overall stiffness of the frame and my mass distribution are also critical factors influencing climbing performance. Shorter stays often provide better rear wheel grip on technical climbs. Shorter chainstays are generally associated with stiffer rear triangles. This can lead to better power transfer and responsiveness during sprinting and climbing. A stiffer frame minimizes flex in the rear triangle. This ensures that more of the force applied to the pedals goes directly into propulsion. It is not lost to movement. While the material composition plays a role, the design with shorter stays inherently contributes to a more rigid structure. This improves efficiency, especially when standing to pedal.
Wheelbase Measurement
The wheelbase measurement is the distance between the centers of the front and rear axles. I measure this by placing the bike on a flat surface. Then I mark the ground directly below the center of each axle. I measure the distance between these two marks.
A longer wheelbase contributes to enhanced stability. This is especially true when riding at higher speeds. Conversely, a shorter chainstay, which reduces the overall wheelbase, can lead to a sensation of decreased stability at speed.
Bottom Bracket Drop/Height Measurement
Bottom bracket drop is the vertical distance from the center of the bottom bracket to a line connecting the centers of the front and rear axles. I measure this by first finding the height of the rear axle from the ground. Then I find the height of the bottom bracket from the ground. I subtract the bottom bracket height from the axle height. This gives me the bottom bracket drop. If the bottom bracket is higher than the axle line, it’s a positive drop. If it’s below, it’s a negative drop (or rise).
More bottom bracket (BB) drop contributes to a more ‘planted’ feel during cornering. Raising the BB can make cornering more challenging. The vertical component of weight through the pedals may fall outside the stable ‘zone’ between the wheel contact patches. This can potentially lead to instability and loss of traction. A higher center of gravity, associated with a higher BB, can allow for less lean angle. It also offers increased ‘flickability’ in corners. This is similar to supermotard bikes. A higher BB might make a bike easier to ‘tip over’ into corners. This is especially true when the cranks are positioned above the axle height. It reduces the leverage needed to initiate a lean.
Head Tube Angle Measurement
The head tube angle is the angle of the head tube relative to the ground. I use an angle finder for this. I place it directly on the head tube.
The head angle, defined as the angle between a horizontal line and an imaginary line through the head tube’s center, directly influences a bike’s steering responsiveness and stability. A steeper head angle (higher degree) results in quicker steering and enhanced agility. This makes the bike more nimble for tight turns. It is also better for climbing. Conversely, a slacker head angle (lower degree) provides greater stability. This is particularly true at high speeds. It improves performance on descents and rough terrain. It also offers a more relaxed riding position.
Trail is determined by the head angle and fork rake. I calculate it by measuring the distance from the point where the head tube axis intersects the ground to the tire’s contact patch. A greater trail value enhances bike stability. A lesser trail value leads to faster, more direct steering. Quicker steering might feel responsive during a brief test. But increased stability provided by greater trail becomes more valuable at higher speeds.
A steep head angle facilitates easier steering at low speeds. This can aid in maintaining balance. Though it carries a risk of oversteer. Conversely, at higher speeds, this quick steering can become a disadvantage. It can potentially make the bike unstable. A slacker head tube angle makes steering more challenging at low speeds. But it offers increased stability at high speeds. This is due to its less sensitive steering response. Furthermore, trail, which is influenced by head angle, fork rake, and wheel size, increases with a slacker head angle when other factors are constant. This increased trail helps keep the front wheel centered. It contributes significantly to the stabilizing effect of a slack head angle.
Seat Tube Angle Measurement
The seat tube angle is the angle of the seat tube relative to the ground. I use an angle finder for this. I place it directly on the seat tube.
Steeper seat tube angles (STA) lead to lower oxygen uptake (VO2), heart rate (HR), minute ventilation, and perceived exertion. This indicates improved cycling efficiency. Increased activity of the Rectus Femoris (RF) during the power phase of the pedal stroke at steeper STAs (80° vs. 70°) contributes to increased efficiency and decreased cardio-respiratory costs. Steeper STAs result in altered ankling patterns. They also cause greater hip extension and ankle plantar flexion. This can enhance power production. It alters the force-velocity and length-tension relationships of bi-articulate muscles. Steeper STAs facilitate a more effective transition from cycling to running for triathletes. This attenuates fatigue and improves subsequent running times.
Interpreting Bike Geometry Measurements
After I measure my bike frame, I need to understand what those numbers mean. This helps me find the perfect bike for my body and riding style. I also consider my rider height and inside leg measurement. These are crucial for determining the correct bike size.
Understanding Geometry Charts
I always look at geometry charts when I consider a new bike. These charts list all the important bike geometry measurements for a specific model. They help me understand the bike’s characteristics. For example, road bikes often use centimeters for their frame size, while mountain bikes typically use inches.
Here are some key measurements I focus on:
Element | Definition | What it tells us |
|---|---|---|
Reach | Horizontal distance from the center of the bottom bracket to the center of the top of the head tube. | How long the bike feels when standing and descending. |
Stack | Vertical distance from the center of the bottom bracket to the center of the top of the head tube. | How tall the front end of the bike is. |
Head Tube Angle (HTA) | The angle of the head tube relative to the ground. | How stable and responsive the steering is. |
Seat Tube Angle (STA) | The angle of the seat tube relative to the ground. | How efficient the pedaling position is and how the bike climbs. |
I know that frame size is the most critical metric in these charts. The industry uses standard sizing guidelines from major manufacturers like Trek, Specialized, and Giant. These align with professional bike fitting principles. I also cross-reference this information with cycling publications to ensure accuracy.
Comparing To Your Current Bike
I find it very helpful to compare the measurements of my current bike to a new one. This helps me predict how a new bike will feel. I look at several key metrics:
Handling Characteristics: I check the head tube angle, chainstay length, bottom bracket drop, wheelbase, and fork rake. These tell me how the bike will steer and handle different terrains.
Riding Position: I compare the head tube length and stack. This helps me understand if the new bike will put me in a more upright or aggressive position.
Sizing and Bike Fit: I focus on effective top tube length, standover height, stack, and reach. These numbers are essential for my overall comfort and fit.
Identifying Your Ideal Fit
To identify my ideal fit, I combine my personal body measurements with the bike’s geometry. This helps me understand how to size up a bike correctly. For example, I use tables that show typical rider height and inseam measurements for different bike frame sizes.
Tip: Always measure your rider height and inseam accurately. This data is your starting point for finding the right bike.
Here is an example of how rider height and inseam relate to mountain bike frame sizes:
Bike Type | Frame Size (inches) | Rider Height (ft/in) | Rider Inseam (inches) |
|---|---|---|---|
Mountain | 15” | 5′ 1″ – 5′ 6″ | 25.0” – 26.7” |
Mountain | 17” | 5′ 6″ – 5′ 10″ | 28.4” – 30.2” |
Mountain | 19” | 5′ 10″ – 6′ 2″ | 31.9” – 33.6” |
By understanding these numbers, I can make an informed decision. I choose a bike that truly fits me.
Using Measurements For Bike Selection
After I measure my bike frame, I use these numbers to choose the right bike. This helps me match a bike to my riding style and body.
Matching Frame Geometry To Riding Style
I know different riding styles need specific frame characteristics. For example, road bikes vary greatly in their bike geometry. I look at charts to understand these differences.
Characteristic | Endurance (Size M) | Aeroad (Size M) | Speedmax (Size M) | Inflite (Cyclocross) (Size M) | Race (Ultimate/Aeroad) (Size M) |
|---|---|---|---|---|---|
Stack Height | 590 mm | 560 mm | 489 mm | 572 mm | 560 mm |
Reach | 378 mm | 393 mm | 438 mm | 393 mm | 393 mm |
Chainstay Length | 415 mm | 410 mm | 420 mm | 425 mm | 410 mm |
Wheelbase | 993 mm | 988 mm | 1,014 mm | 1,018 mm | 988 mm |
Riding Position | More relaxed, comfortable for long distances | Fast and nimble, maintains comfort over long distances | Stretched out, provides stability at speed, aggressive aero | Aggressive race bike with off-road stability | Aggressive, aerodynamic, lower and longer body position |
Purpose | Long-distance comfort, suitable for beginners and experienced riders | Speed and efficiency, fast and nimble | Triathlon/time trial races, dominating local races | Versatility, stability, cyclocross courses, gravel, fast road rides | Fast, efficient, first over the line, stiff for power transfer |
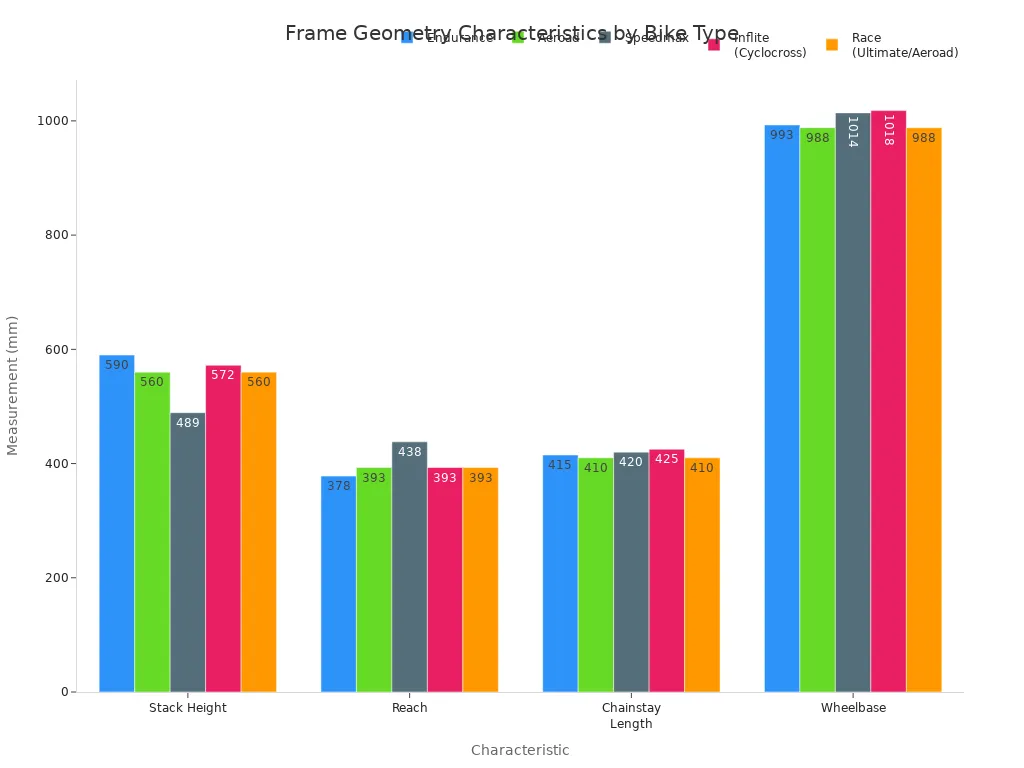
I see endurance bikes have a more relaxed position. Race bikes offer an aggressive, aerodynamic stance. Mountain bikes also have distinct geometry.
Characteristic | What it is | What it tells us | What to look for (Ranges/Trends) |
|---|---|---|---|
Head Angle | Angle of the steer tube, measured from horizontal. | Determines climbing/descending ability. Slacker angles (lower numbers) aid descending; steeper angles aid climbing. | XC: 67-69 degrees; Trail: 65-67 degrees; Enduro: 63-64 degrees; DH: <63 degrees. |
Seat Tube Angle | Angle from the center of the bottom bracket to the top of the seatpost at pedaling height. | Determines rider weight placement relative to axles and how weight distribution changes with trail grade. | Modern full suspension bikes: 72-73 degrees (steep) for better weight distribution and comfort. |
Reach | Horizontal distance from the center of the bottom bracket to the center of the top of the upper head tube opening. | Critical for understanding bike fit and seated/standing room. Longer reach with shorter stems creates roomier cockpits and better handling. | Proportional to frame size; trend is towards longer front ends. |
Stack | Vertical measurement from the center of the bottom bracket to the center of the top head tube opening. | Determines minimum bar height and rider position (upright vs. aggressive). | Proportional to frame size; longer stack on gravity-oriented bikes (DH, Enduro); lower stack on XC/trail bikes. |
Overall Trend | N/A | N/A | “Long, slack and low” geometry, leading to lower centers of gravity, longer wheelbases, and longer reach for high-speed and technical riding. |
A slacker head angle on a mountain bike helps with descending. A steeper seat tube angle improves climbing efficiency.
Considering Personal Proportions
My height and inseam are good starting points. However, I know my torso and arm length are also very important. These measurements influence the top tube length. A longer top tube creates a more stretched-out riding position. A shorter one results in a more upright posture. I remember a woman, 5’7″ with long legs, who needed a 50cm frame. This was smaller than typical for her height. Its top tube length suited her upper body. Stem length adjustments are crucial for comfortable handlebar positioning. This ensures my arms reach naturally without stretching.
When To Seek Professional Fitting
I recommend a professional bike fitting for the best results. This service helps prevent injuries. It also improves my power output. A well-fitted bike enhances comfort. It makes every ride more enjoyable. It ensures the bike adapts to me. This unlocks my full potential as a cyclist. A professional fitting corrects biomechanical imbalances. It reduces or eliminates pain in my joints and muscles. This leads to fewer injuries.
I emphasize the importance of understanding and accurately measuring your bike frame. This ensures a truly personalized and enjoyable cycling experience. These measurements empower you to make informed decisions. You can upgrade, buy a new bike, or fine-tune your current setup. I encourage you to apply these techniques. A well-fitted bike is key to comfort, performance, and long-term cycling satisfaction.